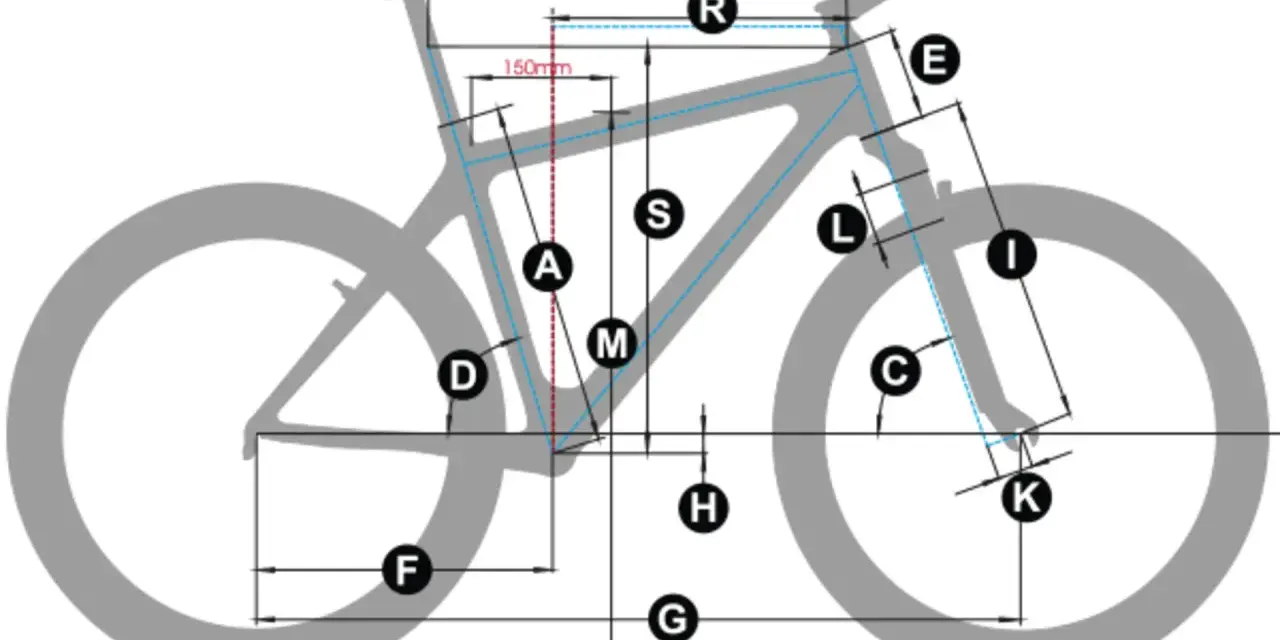
Mountain bike geometry is where a frame decides whether a ride feels calm, playful, or nervous. The most useful numbers show how the bike will climb, descend, corner, and fit your body once the trail gets rough. In this guide I break down the measurements that matter, the trade-offs behind them, and the small setup choices that can turn a good frame into the right one.
Here are the geometry numbers that change how a bike fits and handles
- Reach and stack are the first fit numbers I check, because they describe the cockpit more honestly than top tube length.
- Head angle and wheelbase shape confidence at speed, especially on steep or rough descents.
- Seat angle matters more than many riders expect, because it controls how centered you feel while climbing.
- Chainstay length and bottom bracket height influence cornering, manuals, and pedal strikes.
- Suspension sag changes the real-world feel, so a static chart is only the starting point.
What frame geometry changes on the trail
I think of geometry as the bike's default behavior. A longer front center and wheelbase usually calm the bike down at speed, while a shorter rear center makes the bike easier to loft, flick through switchbacks, and recover from mistakes. The rider's position matters just as much: a centered stance keeps traction under control instead of turning every climb or descent into a constant weight-shift experiment.
That is why two bikes with similar suspension travel can feel completely different. Geometry sets the script; the rest of the build just adds nuance. Once that is clear, the geometry chart stops looking like a spec sheet and starts looking like a map.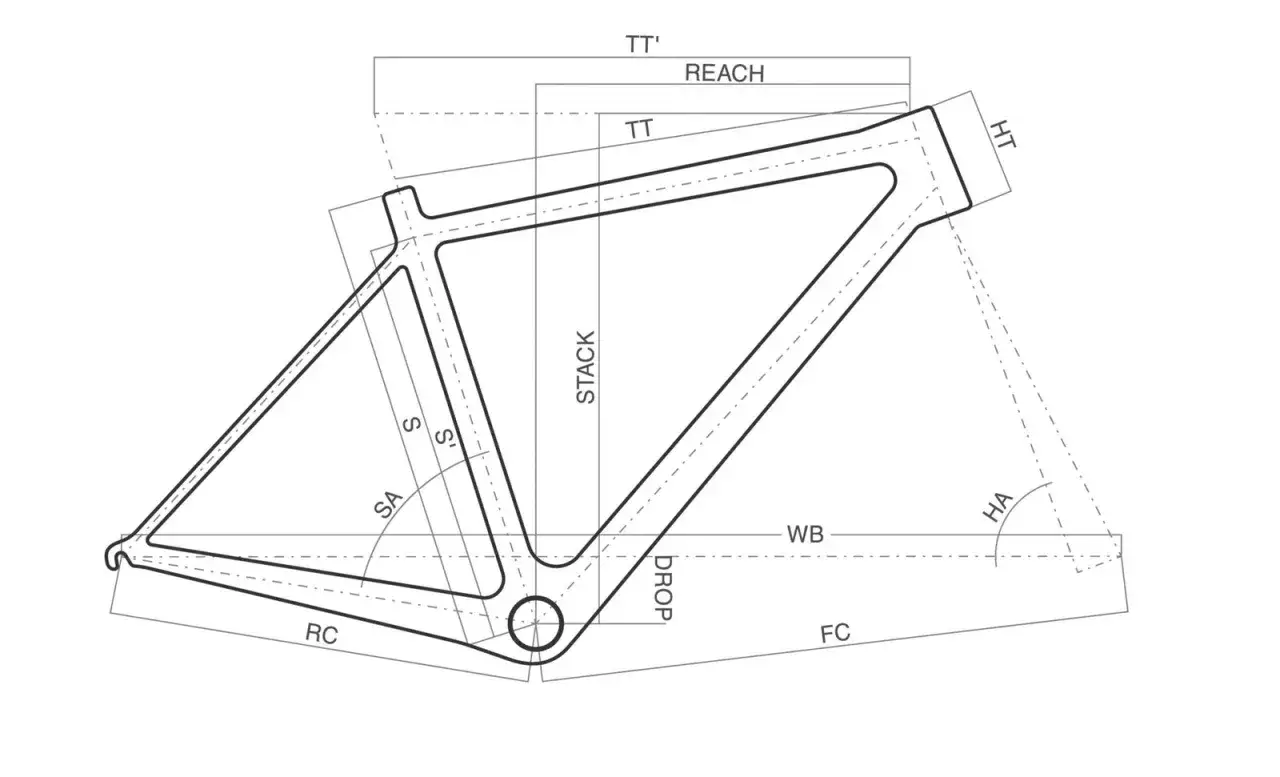
How to read a geometry chart without getting lost
I start with reach and stack because they are the cleanest fit numbers on the page. Reach tells me how much room I have when standing and moving around the bike, while stack tells me how tall the front end will feel without having to guess from the head tube alone. Effective top tube can still be useful, but I trust it less because seat tube angle can make the same number feel very different from one frame to another.| Measurement | What it measures | What it changes on trail |
|---|---|---|
| Reach | Horizontal distance from the bottom bracket to the top of the head tube | Standing room, front-center, descending confidence |
| Stack | Vertical distance from the bottom bracket to the top of the head tube | Bar height, body posture, weight on your hands |
| Head angle | Angle of the head tube relative to the ground | Steering calmness versus quickness |
| Seat angle | The angle you actually sit at, usually the effective number on the chart | Climbing balance and seated power |
| Chainstay length | Distance from the bottom bracket to the rear axle | Agility, manualing, rear-wheel stability |
| Wheelbase and front-center | Axle-to-axle length and the BB-to-front-axle distance | Straight-line stability and room to move |
| BB drop | How far the bottom bracket sits below the wheel axle line | Cornering feel and pedal clearance |
| Fork offset | How far the fork axle sits ahead of the steering axis | Steering speed and trail feel |
Head angle, fork offset, and trail work together, so I rarely judge them in isolation. Trail, in bike terms, is the self-centering effect at the front wheel, and more of it usually feels calmer while less of it usually feels quicker. On a full-suspension bike I also check the numbers at sag if the brand publishes them, because the bike often sits slacker and lower than the static chart suggests.
Once you know how to read the chart, the next question is which numbers matter most for the kind of riding you actually do.
Which numbers matter most for each riding style
The broad categories still matter because riding style changes what you notice first. A fast XC bike and a gravity-leaning trail bike may share a wheel size, but they do not ask the rider for the same posture or input.
| Riding style | Common geometry pattern | How it feels | Best for |
|---|---|---|---|
| Cross-country and downcountry | Steeper head angle, shorter to medium reach, moderate wheelbase | Quick, efficient, and eager to accelerate, but less calm on very steep descents | Climbing, rolling terrain, fitness rides, faster trail loops |
| Trail all-rounder | Balanced reach, mid-60s head angle, steep effective seat angle, moderate wheelbase | Stable enough to descend, still lively in tight turns | Most riders who want one bike for everything |
| Enduro | Long reach, slack head angle, longer wheelbase, lower BB | Planted and confident, with a little less playfulness | Steep descents, rough terrain, bike park days |
| Downhill | Longest and slackest package, with a very stability-focused chassis | Maximum control at speed, least interested in climbing | Lift-served riding and race tracks |
I still do not buy the idea that one category is universally better. A lot of riders in the western U.S. need the extra calm of a longer, slacker bike on fast open descents, while many East Coast riders are happier with a frame that turns quickly and does not feel like a freight train in tight trees. I want the bike to match the speed and shape of the trails I actually ride, not the brochure version of gravity.
The right numbers still depend on body shape and terrain, which is where a lot of riders misread the chart.
How to match geometry to your body and local terrain
Fit is where geometry becomes personal. I look at arm length, torso length, flexibility, and the kind of trails on my home loop before I decide whether a chart is promising or fake-good. A rider who sits tall and likes to move around the bike will often be happier on a different cockpit shape than a rider who stays planted and pedals seated for long stretches.
- If your climbs are long and steep, prioritize a steep effective seat angle and a front end that does not wander.
- If your descents are fast and rough, a slacker head angle and longer front center buy confidence.
- If your trails are tight and slower, too much wheelbase can feel like work in every corner.
- If you are shorter, stack matters a lot because a low front can make the bike feel cramped and hard to breathe on.
- If you are taller or have long arms, reach can be stretched a bit more without feeling awkward.
In practical terms, I think about the trail before I think about the marketing. Steep, loose terrain rewards stability, which is why a bike that feels almost too long on the showroom floor can feel right in Colorado, Utah, or the Pacific Northwest. Tight, rooty, stop-start singletrack often rewards a more balanced bike that changes direction without effort, which is why one rider's dream geometry can be another rider's overbuilt compromise.
I do not try to win the sizing game on paper. I try to keep the cockpit neutral enough that I can climb, descend, and move the bike without compensating for the frame. Even then, a few common mistakes can still ruin a good choice.
The common geometry mistakes that waste good bikes
The mistakes I see most often are usually simple, and expensive.
- Chasing the slackest head angle can make a bike feel calmer downhill, but it can also slow steering and make climbing feel vague if the rest of the frame is not balanced.
- Fixing everything with a shorter stem is a weak substitute for the right reach. A stem swap changes the cockpit, but it does not change how the bike's mass is placed between the wheels.
- Ignoring fork travel leads to bad comparisons. More travel usually changes head angle, bottom bracket height, and front-center, so two bikes on paper may behave very differently on the trail.
- Forgetting sag makes a bike look better or worse than it really is. A full-suspension frame can sit noticeably slacker once the rider is on board.
- Trusting size labels instead of actual numbers causes trouble across brands. A medium from one company can be shorter than a large from another.
- Using saddle position to rescue the wrong frame usually creates a compromise somewhere else. Saddle fore and aft should fine-tune pedaling, not cover up a bad cockpit.
There is also the old myth that lower is always better. A low bottom bracket can help the bike feel planted in corners, but it can also increase pedal strikes on rocky climbs or when tire diameter runs larger than expected. That is the kind of trade-off that only makes sense when the frame and the trail both get considered at once.
When the frame is close, I prefer to tune the setup before I walk away.
How small setup changes can rescue a frame that is close but not quite right
Stem, bar, and fork choices are the quickest ways to reshape how a bike feels. I usually start there because they are cheaper, reversible, and less disruptive than buying a different frame.
| Setup change | What it changes | Best use case |
|---|---|---|
| Shorter stem | Shortens the cockpit and makes steering feel a touch quicker | The bike feels a little too stretched out |
| More spacer height or a higher-rise bar | Raises the front end and reduces weight on the hands | The front feels too low or too aggressive |
| Different fork travel or offset | Changes front-center, head angle, and steering feel | Advanced tuning, or a fork swap you were already considering |
| More tire volume or a larger casing | Adds grip, comfort, and a little extra ride height | The bike feels harsh, skittish, or too low |
| Saddle fore-aft adjustment | Fine-tunes seated balance over the pedals | Climbing balance needs a small correction |
I do not expect a 10 mm stem change to fix everything, and I would never use a parts swap to justify the wrong frame. But small changes can turn a bike from almost right into something I would happily ride all season. That matters because geometry is not just about raw numbers, it is about how those numbers behave once the bike is under real load.
Which is why I finish by checking the few things that tell me whether a frame is worth trusting on real trails.
The three checks I make before I trust a frame on real trails
- Can I climb seated without feeling pitched over the front wheel or stuck too far behind the pedals?
- Can I stand up and move the bike without the bars, knees, or top tube fighting my body position?
- Does the chart still make sense once I include fork travel, sag, tire size, and the bar height I actually want to run?
If any of those answers are uncomfortable, I do not automatically call the frame wrong. I first decide whether a simple setup change can solve the problem or whether the core shape of the bike is fighting the way I ride. In practice, the best mountain bike geometry is not the slackest or the longest one on the market. It is the one that keeps me centered, confident, and free to ride the trail instead of negotiating with the bike.