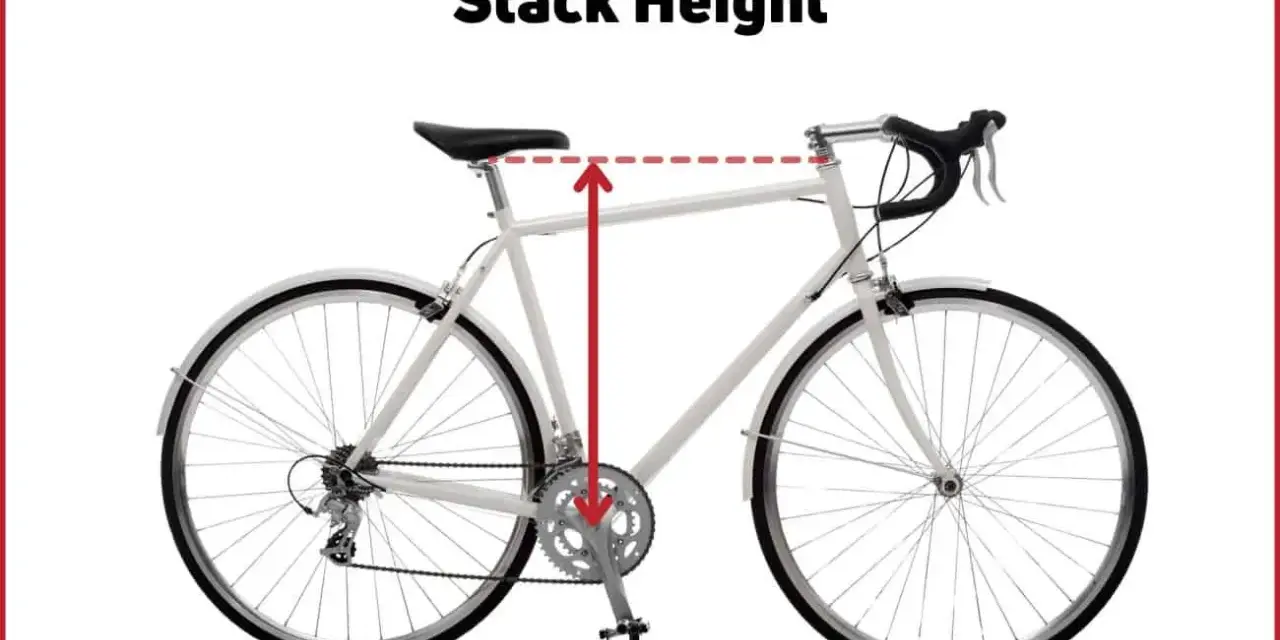
Front-end height changes how a bike breathes, turns, and feels after the first hour in the saddle. When I size a bike, I start with stack because it tells me whether the frame can place the bars at a realistic height before I rely on spacers, stem angle, or a parts workaround. Get that wrong, and even a well-specced bike can feel too low, too tall, or harder to hold comfortably on longer rides.
The quickest route to a bike that fits
- Stack is the frame’s built-in front-end height; stem and spacers only fine-tune it.
- Reach matters just as much, because a higher front end often changes how stretched the cockpit feels.
- Higher stack usually favors endurance, gravel, and relaxed riding.
- Lower stack usually favors race positions, but only when the rider can sustain it.
- The best choice is a frame that reaches your target position with sensible cockpit parts, not a bike that only works with extreme adjustments.
What stack height actually means on a bike
In bike geometry, stack is the vertical distance from the bottom bracket to the top of the head tube. I am talking about front-end fit here, not pedal stack height. In plain English, it tells you how tall the front end of the frame is before you add a stem, spacers, or handlebars. That is why two medium frames from different brands can feel very different even when the size label looks identical.People also use the term more loosely to describe the height of the cockpit once the stem and spacers are installed. I think that distinction matters. The frame stack is the fixed number; the cockpit height is the rideable number. One tells you what the bike is, the other tells you how it will feel under your hands.
Most geometry charts in the U.S. list stack and reach in millimeters, so I recommend thinking in mm from the start. It is the cleanest way to compare bikes across brands, because size names alone do not tell you whether the front end will sit high enough or low enough for your body.
That distinction becomes much more useful once you compare stack with reach, because the two numbers work as a pair rather than as separate answers.
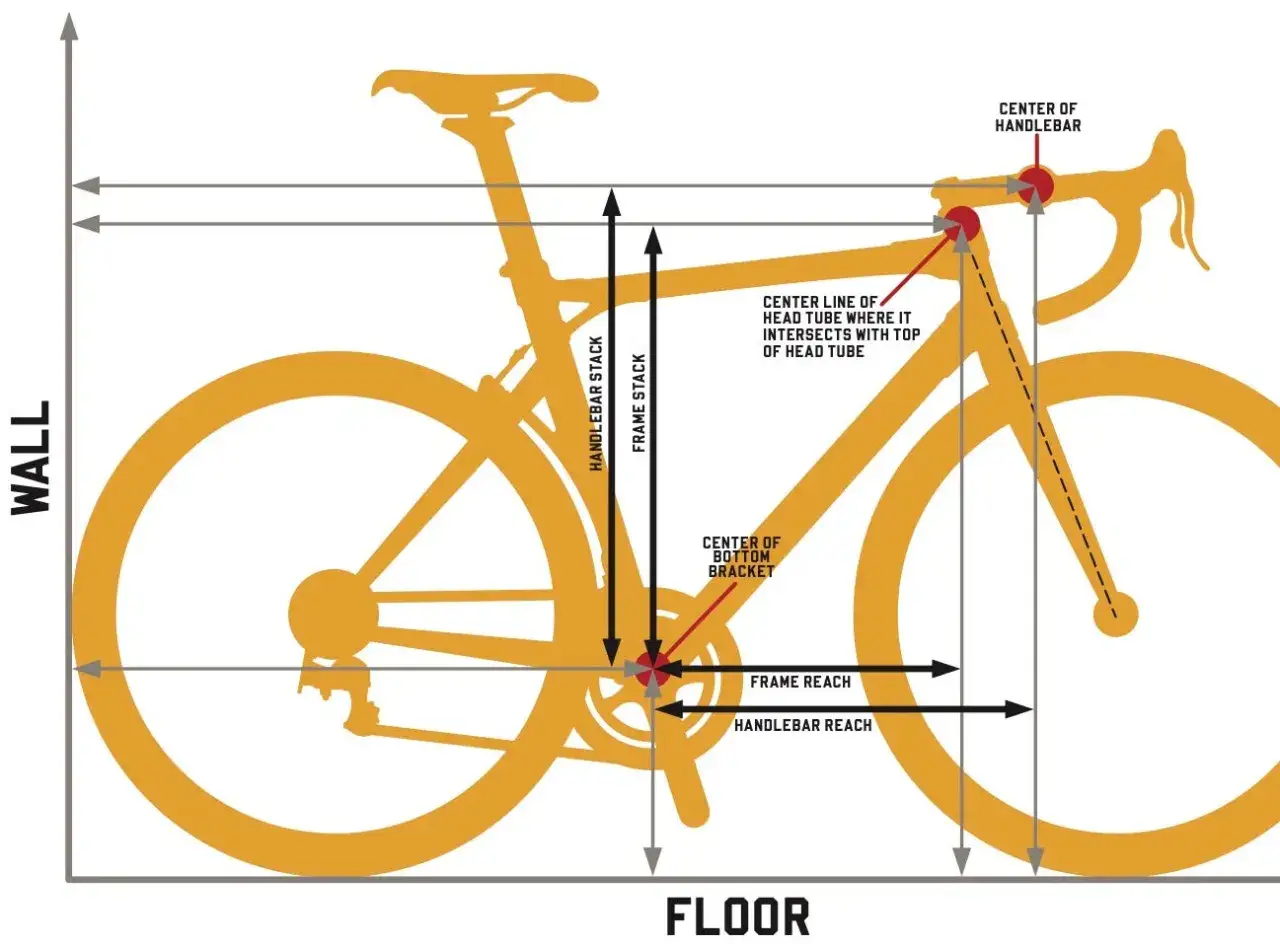
How I read stack and reach before I look at the build
If I only had one rule for bike selection, it would be this: never judge stack by itself. A higher front end can feel great, but if reach is also long, the bike may still feel stretched. A low front end can be fast, but if reach is short, the position may feel cramped and nervous.
That is why many fitters talk about effective stack and effective reach. Those numbers try to account for where your hands actually land after spacers, stem length, stem angle, and bar shape are factored in. They are not perfect, but they are much closer to real-world fit than a frame chart alone.
I use stack and reach to answer a simple question: can this frame get me into the position I want without odd compromises? If the answer is yes, the rest is usually easy. If the answer is no, no amount of wishful thinking will make the frame behave like a different bike.
| Bike type | Stack tendency | What it usually feels like | Best use case |
|---|---|---|---|
| Race road | Lower | Flatter torso, more weight forward, quicker aero position | Racing, fast group rides, riders who want a low front end |
| Endurance road | Higher | More upright, less pressure on hands, easier to stay relaxed | Long rides, rough pavement, riders who value comfort |
| Gravel | Moderate to higher | Stable and controlled, with room to stay comfortable off-road | Mixed surfaces, long days, bikepacking, adventure riding |
| All-road | Middle ground | Balanced, versatile, usually easy to tune | One bike for road, light gravel, and everyday riding |
| Commuter or fitness bike | Often higher | Open chest, easy visibility, low strain on the upper body | Daily riding, casual fitness, urban use |
Once you compare those numbers, the riding-style question becomes much easier to answer.
How stack changes the way a bike rides
Front-end height affects more than comfort. A higher stack usually puts the torso in a more upright position, which can reduce hand pressure, ease neck strain, and make it easier to stay relaxed over long miles. That is one reason endurance and gravel bikes often feel forgiving even before you start adjusting anything.
A lower stack does the opposite. It lowers the bars, encourages a more aerodynamic posture, and shifts a bit more weight toward the front wheel. For racing, that can be exactly what you want. For a casual rider with limited hip or hamstring mobility, it can feel like a constant reach for the bars.
There is also a handling side to this. When the front end is too high for the frame and cockpit, the bike can start to feel like it has been tuned for comfort at the expense of precise weight distribution. When it is too low, some riders feel pinned over the bars and lose the relaxed upper-body control that makes a bike easy to live with on long rides.
In practice, I care less about a bike being “aggressive” or “comfortable” in the abstract and more about whether its stack matches the kind of riding the owner actually does. That is the bridge from geometry to selection.
Which front-end height fits your riding style
The right stack depends on where and how you ride, not just on your height. A taller rider may still prefer a relatively high front end if they do centuries, mixed-surface rides, or long travel days in the saddle. A smaller rider may choose a lower one if they are racing and want a more compact, aerodynamic position.
Here is the practical way I think about it:
- Choose a higher stack if you want a more upright posture, if your hands or neck get tired first, or if you spend a lot of time on rough pavement and gravel.
- Choose a lower stack if you want a flatter torso, if aerodynamics matter more than all-day comfort, or if you already know you can hold a low position without strain.
- Choose a middle stack if you want one bike to cover road riding, light gravel, and everyday use without pushing the cockpit to either extreme.
The biggest mistake I see is treating higher stack as a universal comfort upgrade. Comfort still depends on reach, bar width, hood rotation, saddle position, and even tire choice. Stack can help a lot, but it does not fix a cockpit that is too long or handlebars that are poorly set up.
That is why the next step is not just choosing a frame number, but checking whether the number can be turned into a sensible real-world setup.
How to measure your current setup and compare bikes properly
Before I compare new bikes, I note the cockpit I already ride well. That means the current frame stack and reach, stem length, stem angle, spacer height, handlebar model, and where my hoods sit. If I already like how a bike feels, that setup becomes the baseline for a smarter replacement.
The easiest comparison method is to work from the contact points, not the marketing size. Compare the height of the bars, the distance to the hoods, and the amount of spacer or stem adjustment each frame can realistically support. A bike that looks close on paper may need a strange stem or a pile of spacers to get there, and that is usually a sign to keep shopping.
| Adjustment | What it changes | Best use | Limit |
|---|---|---|---|
| Headset spacers | Raises or lowers the bars | Small height corrections | Only helps within the frame’s built-in range |
| Stem angle | Changes bar height and slightly affects reach | Fine-tuning without changing the frame | Can alter steering feel and rider position |
| Stem length | Mostly changes reach | Shortening or lengthening the cockpit | Too much change can make handling feel off |
| Handlebar shape | Changes hood position, reach, and drop | Small cockpit refinements | Often overlooked during bike selection |
| Frame stack | Sets the starting front-end height | Choosing the right bike model | Cannot be meaningfully changed later |
If I have to force every fit problem into one part swap, I assume the frame is wrong. That is the part buyers regret later, because a bike that needs extremes to fit usually gives up something in handling, appearance, or long-term comfort.
Once you know how to read the chart, the common mistakes become easier to spot.
The mistakes that make stack harder to judge than it should be
The first mistake is buying by size label alone. A “54,” “medium,” or “large” means very little without the actual stack and reach values. The second mistake is thinking a low frame is always faster and a high frame is always slower. In reality, the right front-end height is the one you can hold well, not the one that looks most race-ready in a parking lot.
The third mistake is using too much cockpit hardware to rescue the wrong frame. A very tall spacer tower or an extreme stem choice might work on a test ride, but it often feels like a compromise on real roads. I would rather start closer to the target and make small adjustments than build a fit from the wrong end.
The fourth mistake is ignoring how the rest of the bike changes the sensation. Tire volume, handlebar flare, hood position, and even top tube slope all affect how the bike feels from the saddle. Stack matters, but it is not the only thing your body notices.
The final mistake is copying someone else’s position because they ride the same size bike. Flexibility, torso length, riding goals, and injury history all change what “right” looks like. That is why a good fit is personal even when the geometry chart is public.
With those traps in mind, the last step is making the buying decision with a clear fit window instead of a hopeful guess.
The fit check I would do before I buy
- Can the frame give me the bar height I want without extreme spacers or an odd stem?
- Does the reach still feel sane once the front end is at the correct height?
- Does the bike match the terrain I ride most often, not just the one I wish I rode more?
- Will I still have room to adjust the cockpit later if my flexibility, goals, or riding style change?
- Am I choosing a frame that fits the way I ride now, not the most aggressive version of the bike I can tolerate for ten minutes?
That is the decision rule I trust most: choose the bike that gets close to your target position with normal parts and leaves you room to fine-tune. If a frame only works when I keep explaining away compromises, I keep looking. The right stack is the one that supports the ride you actually want to do, mile after mile.