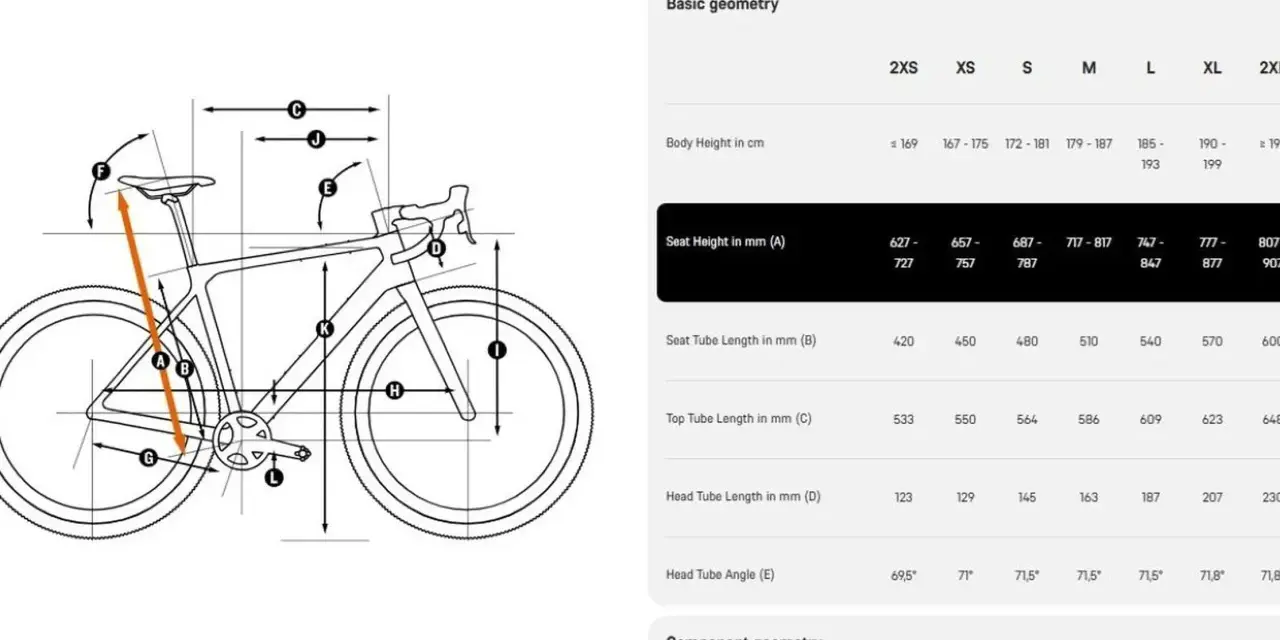
Frame numbers decide whether a bike feels calm, twitchy, stretched, or relaxed long before a wheel ever turns. In practice, good bike geometry turns a size chart into a real purchasing decision, especially when you are choosing between road, gravel, and mountain options. I will break down the measurements that matter, how they change handling, and which trade-offs are worth accepting for the kind of riding you actually do.
The fastest way to judge fit before you test ride it
- Start with stack and reach, not the size label printed on the frame.
- Use head angle, wheelbase, and chainstay length to predict handling, not just comfort.
- Match the frame to your main use case: race, endurance, gravel, or trail.
- Check cockpit parts, tire clearance, and standover before you compare prices.
- Choose a frame that works with a normal stem and spacer setup, not a rescue mission.
Why frame numbers matter more than size labels
Size labels are a starting point, not a verdict. A medium in one brand can feel closer to a small or a large in another, and that is exactly why I start with the frame chart instead of the badge on the top tube. The chart tells me where my hands, hips, and weight will sit over the wheels, which is what actually changes comfort, efficiency, and control.
I treat the frame as the part that sets the bike’s personality. The cockpit and contact points finish the job, but they cannot rescue a frame that is too long, too low, too tall, or too nervous for the way you ride. If the base geometry is wrong, every adjustment after that becomes more expensive and less satisfying.
That is why I care less about category names and more about the measurements that move the rider. Next, I break down the chart itself.
How I read a geometry chart without getting lost
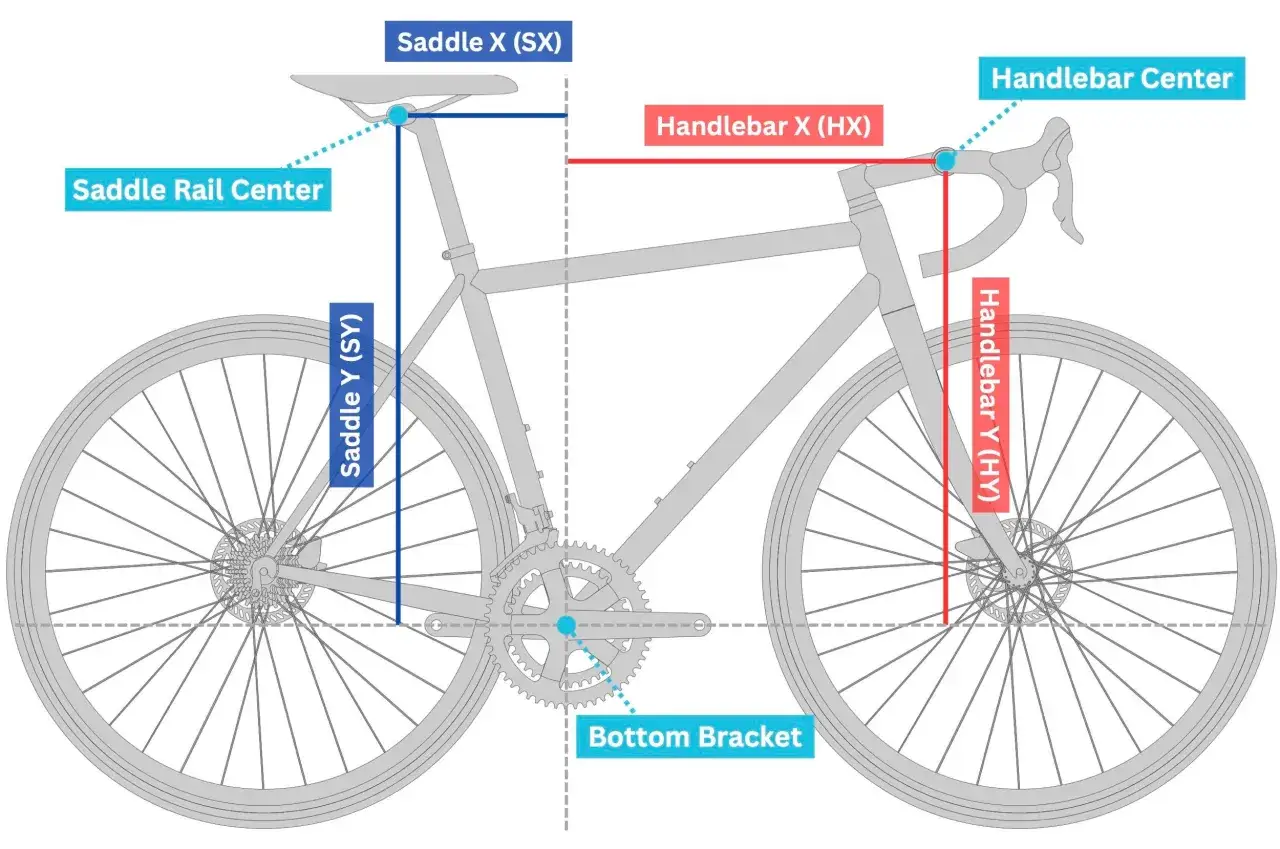
The first numbers I look at are stack and reach, because they tell me how high and how long the frame feels before I even think about stems or handlebars. Stack is the vertical height from the bottom bracket to the top of the head tube. Reach is the horizontal distance. Together, they give a reliable picture of whether the bike will feel upright, aggressive, compact, or stretched.
| Measurement | What it changes | What I look for |
|---|---|---|
| Stack | Front-end height and torso angle | Higher for comfort and long rides, lower for a more aerodynamic position |
| Reach | How stretched out you feel at the bars | Shorter for a compact fit, longer for a race-style position |
| Head tube angle | Steering speed | Steeper for quicker handling, slacker for more stability |
| Seat tube angle | How far forward your hips sit over the pedals | Steeper for a more direct power position, slacker for a more relaxed one |
| Wheelbase and chainstay length | Overall stability | Longer for calm tracking, shorter for a more lively bike |
I also glance at bottom bracket drop, standover, and fork offset. Bottom bracket drop influences how planted the bike feels and how often pedal strikes happen in corners or on rough ground. Standover matters less on modern sloping frames than it used to, but I still want enough clearance to stop confidently in traffic or on loose terrain.
One detail that saves a lot of guesswork is effective stack and reach, when a brand publishes it. Those numbers fold in the cockpit shape, stem length, and spacer setup, so they are closer to how the bike will feel once you are actually holding the bars. Raw frame numbers are useful; contact-point numbers are better.
Once you know what the chart says, the next step is deciding what kind of ride that chart is trying to create.
Match the frame to the riding you actually do
The same geometry can feel brilliant in one discipline and frustrating in another. I use the table below as a practical shortcut when I am comparing bikes for real-world use rather than showroom appeal.
| Bike type | Typical geometry tendency | What it feels like | Best for |
|---|---|---|---|
| Road race | Lower stack, longer reach, steeper angles, shorter wheelbase | Fast, aerodynamic, sharp in corners | Racing, fast group rides, hard efforts on smooth pavement |
| Endurance road | Higher stack, moderate reach, slightly calmer front end | Comfortable without feeling dull | Long days, fondos, rough pavement, riders who value posture |
| Gravel and all-road | Moderate to high stack, moderate reach, longer wheelbase, often a slacker front end | Stable and predictable when the surface changes | Mixed pavement, hardpack, light bikepacking, rough backroads |
| XC or trail mountain bike | Longer reach, slacker head angle, longer wheelbase, more room to move | Confident on descents and more forgiving off-road | Singletrack, technical terrain, climbs and descents in equal measure |
The biggest mistake is borrowing the logic of a racing bike for every category. A slacker mountain bike is not automatically better, and a super-long gravel frame is not automatically faster. It depends on whether the bike is supposed to sprint, climb, descend, or carry you through a six-hour day in one stable position.
If you ride mostly pavement with occasional gravel, I usually prefer the more upright end of the spectrum. If your local terrain is rough or fast descending matters more than razor-sharp steering, I lean toward extra wheelbase and a calmer front end. The right answer is the one that matches your roads, trails, and fitness rather than a pro rider’s most aggressive setup.
That is where the chart becomes less about numbers and more about trade-offs.
The comparison checklist I use before buying
When I compare two bikes, I do it in a fixed order so the marketing noise does not take over. First I ignore the size badge and compare stack and reach. Then I check whether the bike can be built into a sensible position with a normal stem and a modest spacer stack. If the answer requires an extreme workaround, I treat that as a warning sign, not a clever fit trick.
- Compare stack and reach first, because size labels alone are not standardized across brands.
- Check the head angle, wheelbase, and chainstay length to understand how stable or reactive the bike will feel.
- Confirm that the frame works with the tire size you actually want to ride.
- Look at standover and saddle height range so the bike fits both at speed and at a stoplight.
- Ask whether the cockpit can be adjusted naturally, without relying on odd stem lengths or a huge spacer tower.
- Test ride in the position you expect to keep, not in the demo setup that flatters the bike.
When I am between two sizes, I compare the smaller frame’s reach against the larger frame’s stack. In many cases the smaller frame is easier to fine-tune, but only if the reach is not already too short for your body. If a bike needs drastic part swaps to feel normal, I do not call that a fit win.
The same caution applies to the mistakes people make when they buy by spec sheet alone.
Mistakes that make a good frame feel wrong
- Buying for the label instead of the numbers, then wondering why the bike feels off.
- Chasing a pro-level position that you cannot hold for more than a short, hard ride.
- Using head tube length as the main fit clue instead of stack and reach.
- Trying to fix a bad frame with a stem that is too short, too long, or too extreme.
- Ignoring tire clearance, then realizing the bike only fits the narrow rubber that came on it.
- Assuming one metric tells the whole story when handling actually comes from the whole package.
Those mistakes are expensive because they are hard to repair with parts alone. A 10 mm stem change is noticeable, and a 20 mm change can alter the bike’s character, but no stem swap can turn a fundamentally wrong frame into the right one. I would rather start with a frame that is close and refine it than force an elegant chart into an awkward build.
Once you know what to avoid, the last step is deciding which compromises are actually acceptable for your budget and riding style.
The geometry clues that save the most money on a bike purchase
If I had to reduce the whole decision to a short list, it would be this: choose the frame that fits your posture first, then verify that it handles the way your riding demands. After that, make sure the cockpit, tires, and saddle position can be adjusted without pushing the bike into a strange setup.
- Prioritize fit over hype. A bike that matches your body is almost always more enjoyable than a more expensive frame that forces compromises.
- Match handling to terrain. Stable geometry helps on rough roads and descents; quicker steering helps on smoother, faster rides.
- Leave room for adjustment. Good frames let you fine-tune the position instead of forcing a permanent workaround.
When I look at bike geometry with a buyer’s eye, I care less about the marketing size and more about whether the frame gives me room to fit, ride, and enjoy the bike for years. If it does that, the rest of the build is optimization. If it does not, no amount of expensive parts will make the bike feel right.