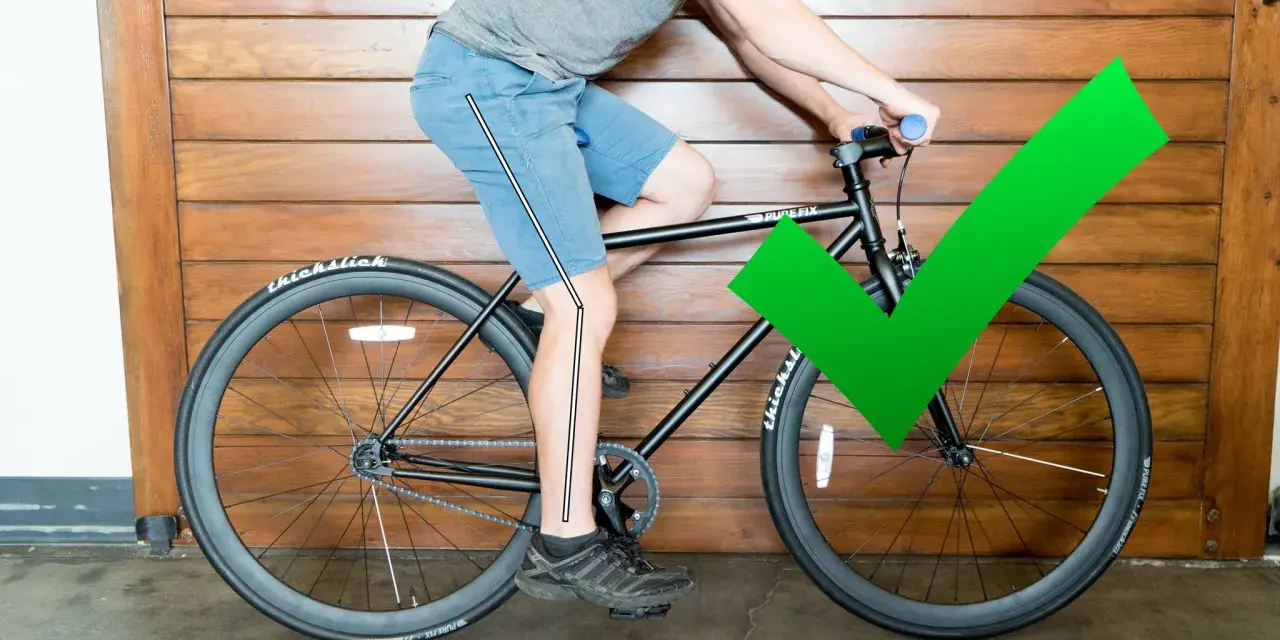
Start with a repeatable setup, then adjust in tiny steps
- Use a simple home check first, then confirm the result with a short ride.
- A saddle that is too low usually feels cramped and heavy on the front of the knee.
- A saddle that is too high often causes hip rocking, toe-pointing, or tension behind the knee.
- Make changes in 2 to 3 mm steps unless the bike is clearly far off.
- Always test with the shoes and pedals you actually ride.
- If you are buying a bike, make sure the frame and seatpost can reach your fit without running out of adjustment.
Why saddle height changes the whole ride
Saddle height is not a minor comfort tweak. It changes how your knee tracks, how much your hips move, and how smoothly you can produce force through the pedal stroke. When the saddle sits too low, the knee stays too closed and the quads end up doing more of the work than they should. That often feels like a busy, cramped pedal stroke, especially on longer rides.
When the saddle sits too high, the body usually compensates in a different way. I look for hip rocking, a slight reach for the bottom of the stroke, and tension behind the knee or in the hamstrings. The goal is a quiet pelvis and a smooth, repeatable stroke, not a locked-out leg or an exaggerated bend. That is why even a small adjustment can change the way the whole bike feels.
The important part is that there is no single magic number for every rider. Inseam, crank length, shoe stack, riding style, and even the saddle shape all shift the answer a little. Once you understand that, the next step is finding a starting point you can trust instead of guessing.
How I find a starting point before fine-tuning
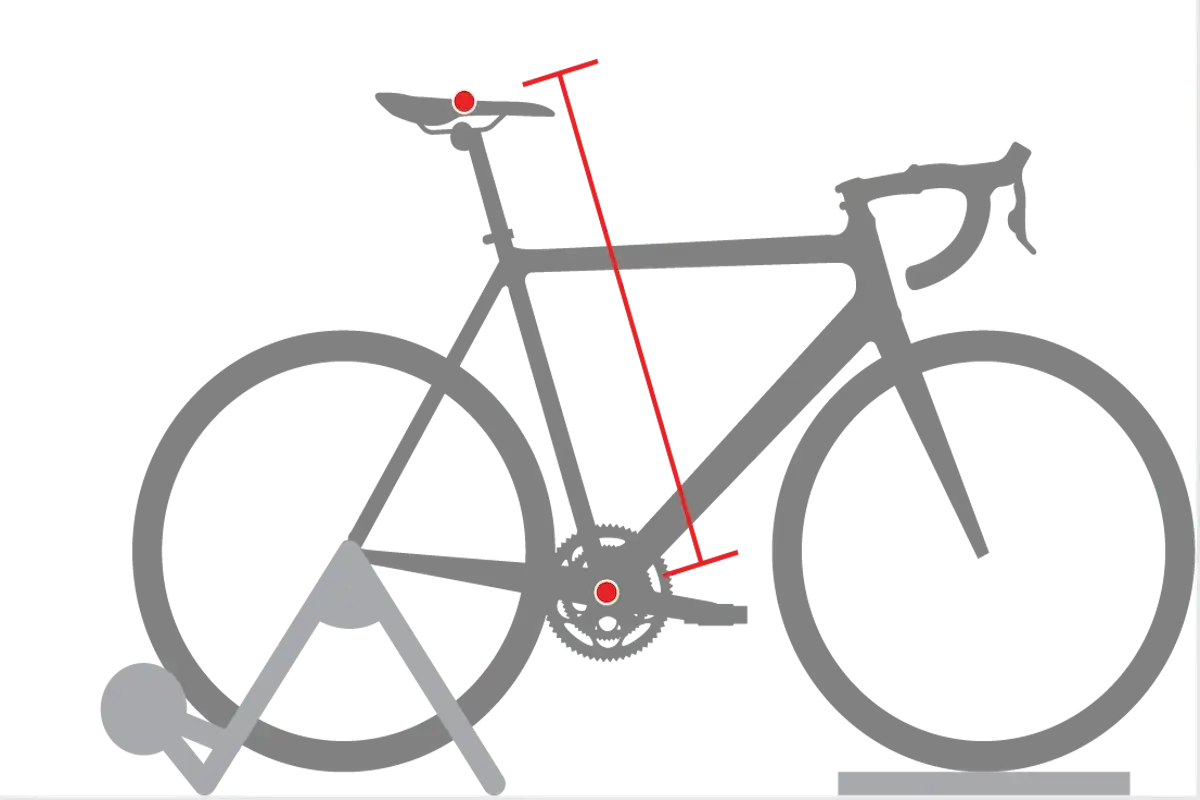
I like to begin with one of three practical checks. They are not competing methods so much as different ways to get close enough to ride and then refine.
| Method | How to use it | What you are aiming for | Best use |
|---|---|---|---|
| Heel test | Put your heel on the pedal at the bottom of the stroke with the bike held upright. | Your leg should be straight without your hips rocking side to side. | Fast home setup and first-time adjustment. |
| Knee-angle check | Ride normally and look at the bend in the knee when the pedal is at 6 o'clock. | Roughly 25 to 30 degrees of bend, with 25 to 35 degrees still usable as a practical range. | Closer fit when you want a more precise result. |
| Inseam formula | Measure inseam in inches or centimeters, then multiply by 0.883. | A useful starting height, usually measured from the bottom bracket to the saddle top. | New bike builds or a baseline when nothing else is set yet. |
If I am fitting a bike at home, I usually start with the heel test because it is simple and repeatable. If I want a closer check, I use the knee-angle method and try to film myself or look in a mirror. REI's fit advice lands in the same neighborhood here, pointing riders toward a slightly bent knee rather than a fully extended leg. That is the right mindset: close first, then refine.
One practical detail matters more than many riders realize. Measure and test with the shoes you actually ride in, because cleats, thick soles, and pedal stack change leg extension by a few millimeters. That small difference is enough to matter, especially once you are trying to make the bike feel right for real riding rather than for a parking-lot test.
Once the setup is close, the body usually tells you which direction to move next.
Read the clues your body gives you
I do not trust one symptom on its own. Instead, I look for a pattern that holds after 20 to 30 minutes of steady riding, because the first five minutes can be misleading. A good saddle height should feel boring in the best possible way: no slipping, no hip sway, and no need to think about your leg extension.
| What you feel | What it often means | My first adjustment |
|---|---|---|
| Front of knee pain, heavy quad burn, or a cramped stroke | Saddle may be too low | Raise it 2 to 3 mm and retest |
| Back of knee tension, toe-pointing, or hip rocking | Saddle may be too high | Lower it 2 to 3 mm and retest |
| Sliding forward, hand pressure, or a choppy pedal stroke | Often saddle height, but sometimes reach is also involved | Check height before moving the bars |
| Numbness or soft-tissue pressure | Usually saddle shape, tilt, or fore-aft position | Do not keep chasing height blindly |
Small changes beat dramatic ones. If the bike is obviously far off, I may make a 5 mm move, but I avoid bigger jumps than that because they can create a new problem before the old one is solved. The point is not to guess faster; it is to reduce variables until the ride feels stable.
That becomes even more important when the bike itself changes, because different bike categories reward slightly different priorities.
How bike type changes the answer more than most riders expect
The basic logic is the same on almost every bike, but the way you use the bike changes the final setting. A road bike, a gravel bike, a mountain bike, and a commuter all ask your body to do different things, so I do not expect one seat height to feel identical across all of them.
| Bike type | What matters most | How saddle height usually shifts |
|---|---|---|
| Road | Efficient seated pedaling and consistent cadence | Tiny changes matter a lot, so precision is worth it |
| Gravel | Comfort over longer mixed-surface rides | Start with a road-like setup, then check fatigue after longer efforts |
| Mountain | Seated climbing plus room to move on descents | Pedaling height still matters, but dropper-post travel and standing control are part of the picture |
| Commuter or e-bike | Easy starts, stops, and predictable handling in traffic | A slightly more conservative feel can be practical if you stop often |
Once the bike type is clear, I look at the details around the saddle itself, because those details can quietly shift the fit.
The setup details that quietly change the number
When a saddle feels wrong, height is only one possible cause. I have seen riders chase the wrong adjustment for weeks because a different part of the setup was moving the body out of position.
- Crank length changes how closed the knee feels at the top and bottom of the stroke. If you swap from 170 mm to 175 mm cranks, recheck saddle height.
- Shoes and pedals change stack height. Ride in the shoes you actually use, not the pair sitting closest to the door.
- Saddle shape influences pelvic rotation. A wider or more curved saddle can change how high the seat feels even if the tape measure says nothing moved.
- Saddle tilt matters too. A nose-up saddle can make a rider slide backward and feel like the height is wrong when the real issue is angle.
- Flexibility and fatigue affect perception. Tight hamstrings or a tired core can make a good fit feel too high because the body can no longer stay stable.
- Suspension and sag matter on mountain bikes. Set the saddle with the bike in its normal riding state, not in a static garage setup that never matches the trail.
I usually lock in saddle height before I chase reach or bar position, because a bad seat height can make every other part of the fit look wrong. That keeps the process honest and prevents a small problem from spreading into a full bike setup mess.
Even with a good process, a few common mistakes still show up over and over, and they are easy to avoid once you know what they are.
Mistakes that waste good fit work
- Making big changes at once. If you move the saddle 10 mm and the ride gets worse, you no longer know which direction to correct.
- Testing for only a few minutes. A setup that feels fine in the driveway can fail after half an hour.
- Measuring with different shoes than you ride in. That adds a hidden variable that makes every other number less useful.
- Confusing saddle height with fore-aft or handlebar reach. Those settings interact, but they are not the same problem.
- Ignoring saddle tilt. A tilted saddle can create pressure and sliding that look like a seat-height issue.
- Copying someone else’s number. Two riders can share the same inseam and still need different settings because of crank length, flexibility, and riding style.
If pain is sharp, one-sided, or keeps coming back after several rides, I stop treating it as a simple adjustment problem. At that point it is worth getting a professional bike fit or checking for a separate physical issue instead of endlessly moving the saddle up and down.
With those mistakes out of the way, the last thing I check is whether the bike and the setup are really ready for the kind of riding the owner wants to do.
What I check before a long ride or a new bike
Before I commit to a long ride, a new frame, or a change in pedals, I run through a short checklist. It saves time later and makes the fit easier to trust.
- Confirm the saddle height with the shoes and pedals you will actually use.
- Check that the seatpost has safe insertion and enough adjustment range.
- Ride for 20 to 30 minutes on terrain that resembles your normal riding.
- Make only one adjustment at a time.
- Recheck the fit after any change to cranks, shoes, pedals, saddle, or dropper-post setup.
If I had to reduce the whole process to one sentence, it would be this: start with a simple home check, listen to what your body says, and refine in very small steps. That is the most reliable way I know to find a saddle height that disappears under you, which is exactly what a good fit should do.