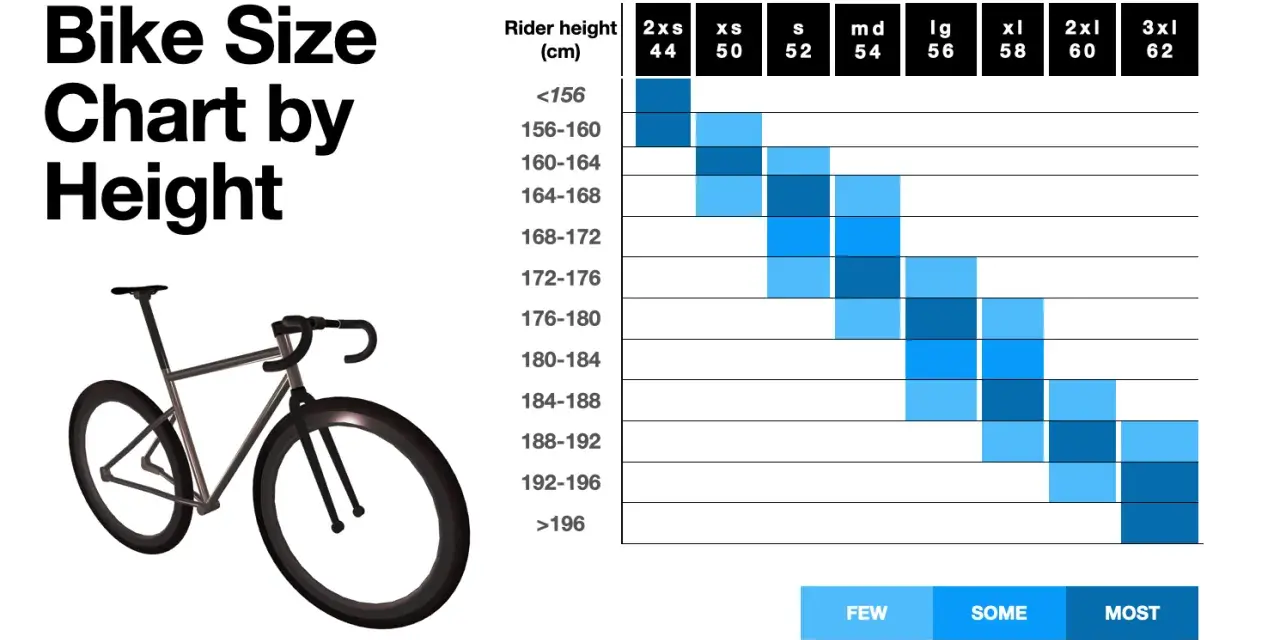
Matching a road bike to your height is the fastest way to avoid a frame that feels stretched, cramped, or twitchy. A practical road bike frame size by height chart gets you close, but inseam, torso length, and geometry decide whether the bike actually fits well. In this guide, I’ll show you the starting sizes, how to measure yourself at home, and how to choose when you fall between two options.
The quickest way to narrow your road bike size
- Start with height to get a rough frame size, then confirm it with inseam.
- Use the chart as a starting point only; road bike sizing varies by brand.
- If you are between sizes, decide based on reach, riding style, and flexibility.
- Standover clearance matters, but cockpit length usually matters more on the road.
- After the frame is right, saddle and bar setup fine-tune the fit.
Use height as the first filter
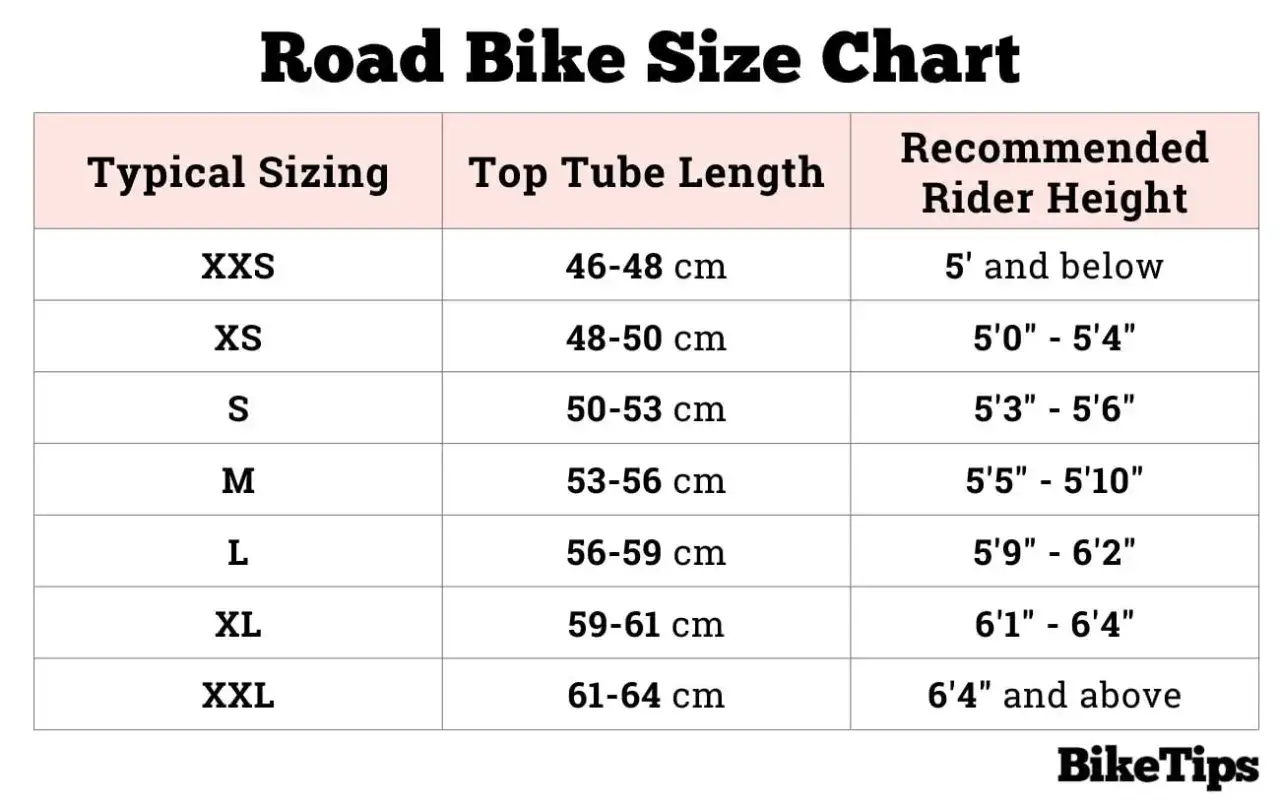
I start with height because it gets you into the right neighborhood quickly. Trek notes that height and inseam are the main starting points for road sizing, and that is the right order of operations for most riders. The chart below is the practical range I would use before I look at any deeper geometry numbers.| Rider height | Typical road frame size | Common label | What it usually means |
|---|---|---|---|
| 4'10" to 5'0" | 47-48 cm | XXS | Compact road frames with a shorter cockpit |
| 5'0" to 5'3" | 49-50 cm | XS | Small frames that still leave room to adjust fit |
| 5'3" to 5'6" | 51-53 cm | S | Often the right zone for smaller adults |
| 5'6" to 5'9" | 54-55 cm | M | A common sweet spot for average-height riders |
| 5'9" to 6'0" | 56-58 cm | L | Usually a longer, more stable-feeling road frame |
| 6'0" to 6'3" | 58-60 cm | XL | More front-end and cockpit room |
| 6'3" to 6'6" | 61-63 cm | XXL | Largest mainstream road sizes |
BikeRadar makes the same basic point: treat the range as a starting guide, because different brands do not size road bikes in exactly the same way. A 54 cm from one brand can feel closer to a 56 cm from another once you sit on it.
That is why the chart narrows the field, but it never closes the case. The next step is the part that protects you from a bad blind purchase: measuring inseam and standover.
Measure inseam and standover before you trust the chart
Height is useful, but inseam tells me much more about whether a road frame will feel manageable. I want the rider to be able to stand over the bike with enough clearance to avoid awkward dismounts, and I want the saddle height to land in a range that supports efficient pedaling.
Measure height correctly
Stand barefoot against a wall, look straight ahead, and mark the top of your head with a book or ruler held flat. Then measure from the floor to the mark. Shoes add noise to the number, and that noise is exactly what you do not want when you are choosing a frame.
Measure inseam the way fitters do
Use a hardcover book or similar flat object between your legs, spine up, and measure from the floor to the top edge. I prefer this method because it gives a more realistic cycling number than jeans inseam or inseam from clothing tags. A common fit rule is to leave about 1 to 2 inches of clearance when you are standing over the top tube.
Read Also: Best Fixed Gear Bike Brands - Find Your Perfect Fixie
Check standover clearance
If the top tube comes too close to your body, the frame may still be “your size” on paper but feel wrong in practice. A little clearance is normal; zero clearance is not a sizing strategy. This is especially important if you ride in traffic, stop often, or want a bike that is easy to handle at low speed.
Once those body measurements make sense, the real difference between two good-looking options comes from geometry, not the sticker on the frame.
Why the same height can lead to different frame sizes
Two riders can be the same height and still need different road bikes. One may have a longer torso, the other longer legs; one may ride in a relaxed endurance position, the other in a lower racing position. That is why I pay close attention to reach, stack, and top tube length, not just the frame label.
| Geometry term | What it affects | Why I care |
|---|---|---|
| Reach | How far you stretch to the bars | Too much reach feels long and can load the hands and shoulders |
| Stack | Handlebar height | Too little stack forces a lower, more aggressive position |
| Effective top tube | Overall cockpit length | Useful for comparing how long a bike will feel when riding |
| Head tube length | Front-end height | Longer head tubes usually make it easier to sit upright |
| Wheelbase and chainstay length | Handling stability | Longer numbers usually feel calmer at speed |
I like this section because it explains a common frustration: the “correct” size on paper can still feel wrong if the cockpit is too long or too low. This is also where brand differences show up most clearly, because one company’s race frame may be another company’s endurance frame with a different label. Once you understand that, the question becomes less about finding one perfect number and more about choosing the better compromise.
What to do when you are between sizes
Being between sizes is normal, and I would not treat it as a problem unless the geometry is a bad match. In most cases, the smaller frame is easier to make comfortable because you can add a little stem length or stack, while a frame that is too large is harder to rescue if the top tube is already too long.
- Choose the smaller size if you want a more agile feel, ride aggressively, or have a shorter torso.
- Choose the larger size if you want a more stable feel, have a longer torso or arms, or prefer a taller front end.
- Lean smaller if you are flexible enough to go lower without discomfort.
- Lean larger only if the reach still works and you are not forced into an awkward stretch.
- If the brand offers both endurance and race geometry, compare those designs before you decide.
I would rather slightly reduce reach than try to fix a frame that is fundamentally too long. That keeps the bike easier to tune later and usually leaves more room for a comfortable cockpit setup. The catch is that no sizing rule survives a sloppy first impression, which is why the next section matters.
Common sizing mistakes that waste a good bike
- Choosing by height alone and ignoring inseam.
- Assuming all 54 cm or all medium frames fit the same.
- Confusing standover clearance with a complete fit check.
- Buying for a brand label instead of the actual geometry chart.
- Trying to fix a frame that is too long with a short stem and hoping for the best.
- Ignoring flexibility, which can turn a technically correct size into an uncomfortable one.
The biggest mistake, in my view, is treating the frame as if it were adjustable in every direction. It is not. A saddle, stem, and bar setup can refine fit, but they cannot fully compensate for the wrong front-end length or an awkward frame height. That is why the setup after the purchase still deserves attention.
The adjustments that make the right frame feel right
Once the frame size is close, I focus on the contact points. Saddle height changes pedaling efficiency, stem length changes reach, and handlebar height changes how much pressure you carry through your hands and lower back. Those adjustments do not replace sizing, but they decide whether the bike feels sharp and natural or merely acceptable.
- Saddle height should let you pedal smoothly without rocking your hips.
- Stem length can fine-tune cockpit length, but it should not be used to rescue a wildly wrong frame.
- Handlebar spacers and bar shape can calm a low, aggressive position if you prefer endurance comfort.
- Cleat position and saddle setback matter once the frame is close, because poor foot and hip alignment can mimic a bad size.
If a bike is close but not perfect, I would rather make these controlled adjustments than buy the next size up or down blindly. That is especially true for riders who commute, travel, or ride long weekend miles, because comfort tends to matter more than bragging rights about frame numbers. With that in mind, here is the checklist I would actually use before clicking buy.
What I would confirm before buying the frame
I would compare the exact model’s geometry chart, not just its size label. If the bike has a relaxed endurance shape, I can usually tolerate a little more frame height; if it is a racier frame, I pay more attention to reach and stack because those numbers affect comfort faster than the size tag does.
I would also check the return policy, the stem length the bike ships with, and whether the brand offers a shorter or taller cockpit in that model line. Those details are easy to ignore, but they decide whether a “close enough” bike becomes a great one or an annoying one. If the fit still feels borderline after that, I would size in the direction that keeps the cockpit manageable rather than chasing a bigger number on the frame.
The best road bike size is the one that lets you ride often without thinking about the frame. If you get the height range right, verify inseam and standover, and then choose the geometry that matches how you ride, you will avoid most of the expensive fit mistakes people make when they buy too quickly.