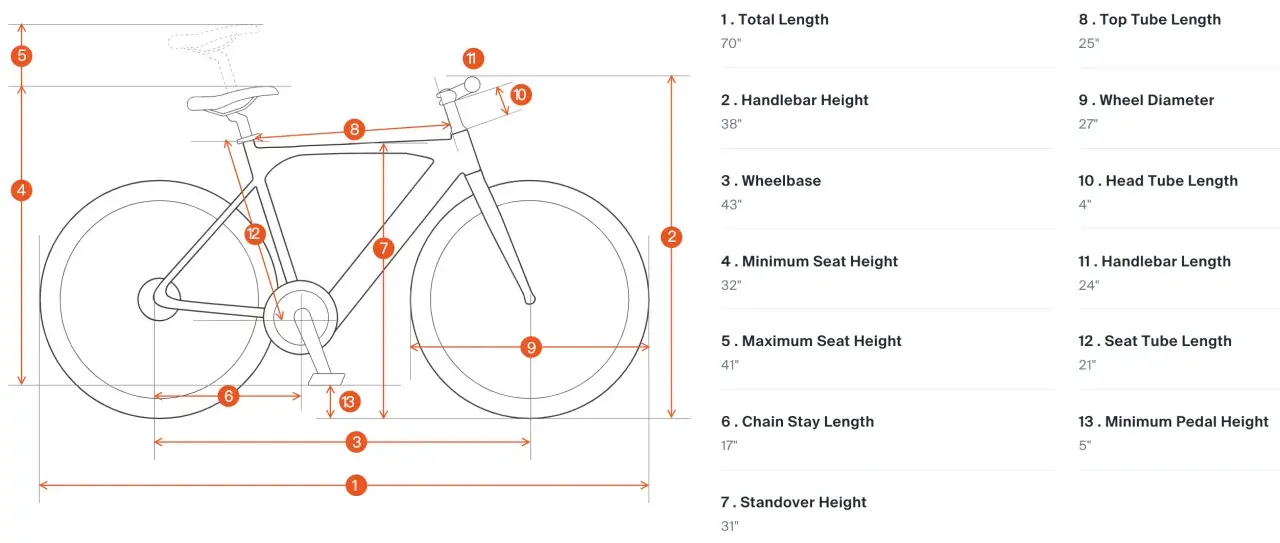
Clearance over the top tube affects how confidently a rider can stop, start, and handle a bike when the ground is uneven. Bike standover height is the distance from the ground to the top tube, and it becomes most useful when you are choosing between sizes or deciding whether a frame is simply too tall for your inseam. In this guide I cover what the number really means, how to measure it properly, how much clearance makes sense for different riding styles, and when other fit measurements deserve more weight.
Key takeaways for choosing the right frame clearance
- Standover clearance is a fit check, not a complete sizing system.
- Measure your inseam carefully, then compare it to the bike’s published geometry.
- For road bikes, about 1 inch of clearance is usually a practical starting point.
- For mountain, touring, urban, and comfort bikes, around 2 inches or more is safer and more comfortable.
- On mountain bikes, reach and effective top tube often matter more than standover alone.
- Two sizes can both work on paper, but riding style usually decides the better choice.
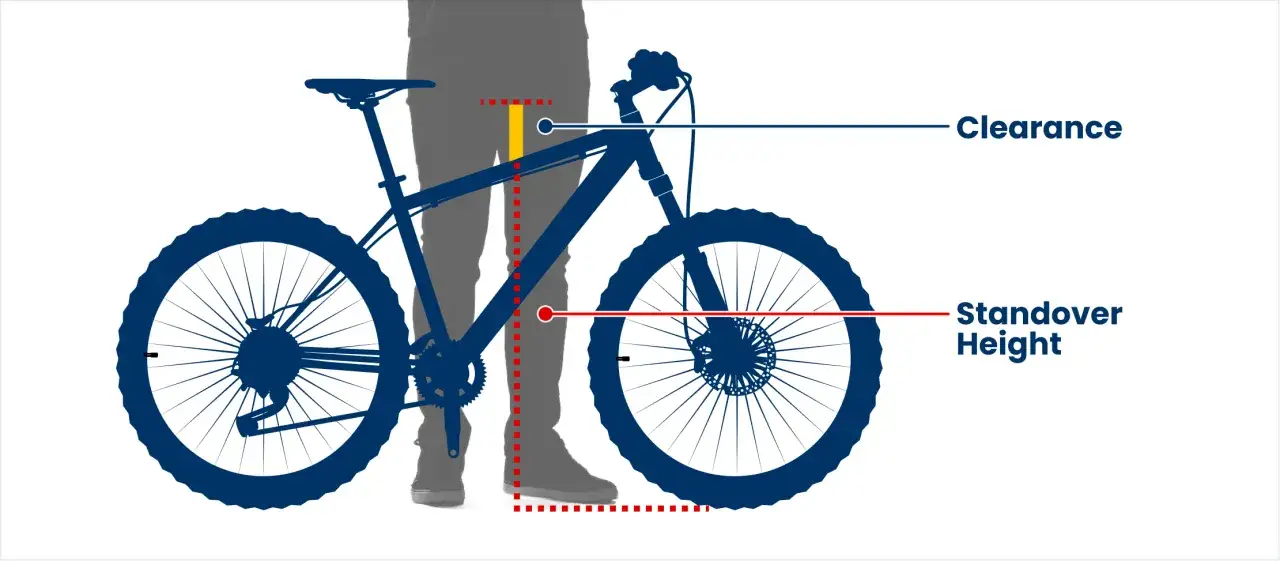
What standover clearance actually tells you
Standover clearance is the gap between your body and the top tube when you are standing flat-footed over the bike. The measurement matters because it affects balance at stops, confidence during mounting and dismounting, and safety if you need to put a foot down quickly on a cambered road or loose trail.
What it does not tell you is whether the bike will fit your torso, arms, or preferred riding posture. A bike can clear your inseam and still feel too stretched out, too short, or awkwardly upright once you start pedaling. I treat this measurement as a gatekeeper: if it fails, the size is wrong; if it passes, you still need to check the rest of the fit.
For road and fitness bikes, the number often helps narrow the field fast. For trail bikes, the balance shifts because modern geometry prioritizes handling and body position more than a tall top tube. That leads straight to the question most riders actually need answered: how much clearance is enough for the bike they want?
How to measure it without fooling yourself
Measure your inseam first, because that is the number you compare against the frame. A simple wall-and-book method works well: stand barefoot, place a book firmly against your crotch to mimic saddle contact, keep it level, mark the wall, and measure from the mark to the floor. If you want a sizing number you will actually use while shopping, repeat the measurement once with the shoes you plan to ride in.
Then look up the frame’s published stand-over figure or geometry chart. Do not compare only bike size labels such as S, M, or 54 cm. Those labels vary by brand, and the same nominal size can have very different top tube shapes.
Two details matter here. First, sloping top tubes can create more usable clearance than the label suggests. Second, tire size changes the measurement you feel on the floor, especially on gravel and mountain bikes. That means the chart matters more than the marketing name on the frame. If you want a quick visual, this is the section where I would look for a clear geometry diagram rather than a glossy product shot.
How much clearance makes sense by bike type
There is no single magic number, but there are practical ranges. REI’s sizing advice still uses about 1 inch for road bikes and around 2 inches for mountain, touring, urban, and comfort bikes as a starting point, which is a useful baseline when you are comparing frames.
| Bike type | Practical clearance | Why it usually works |
|---|---|---|
| Road | About 1 inch / 2.5 cm | Enough room for quick stops without making the frame feel unnecessarily tall. |
| Endurance and gravel | About 1 to 2 inches / 2.5 to 5 cm | More room helps when you stop on mixed surfaces or move around the bike off-road. |
| Hybrid, urban, and touring | About 2 inches / 5 cm | Useful for frequent stops, traffic lights, loaded riding, and easy dismounts. |
| Mountain and trail | About 2 to 4 inches / 5 to 10 cm | Extra room adds confidence on uneven ground and during quick foot-down moments. |
| Kids’ bikes | About 2 to 4 inches / 5 to 10 cm | More clearance helps young riders feel stable while they learn starts and stops. |
These ranges are not laws. A very confident road rider on smooth pavement may be happy with minimal clearance, while someone riding city streets with frequent stops may prefer more room than the chart suggests. I would always bias toward more clearance when the riding environment is unpredictable.
Why the top tube is only one part of the decision
On modern mountain bikes, I pay as much attention to reach as I do to stand-over room. Trek points out that for mountain bike sizing, reach and effective top tube are often more useful than standover alone, because they describe how the bike fits when you are standing on the pedals and moving the bike under you.That matters because a bike can be easy to straddle but still feel wrong on the trail. If the reach is too long, you will feel stretched and slow to react. If it is too short, the bike may feel cramped and twitchy. Stack, stem length, handlebar rise, and saddle fore-aft position can all change the feel, but they are fine-tuning tools. They should not be used to rescue a frame that is fundamentally the wrong size.
For road riding, the decision is slightly different. Standover still matters, but torso length, shoulder width, and preferred position often have more influence on comfort over longer rides. That is why I never judge a frame on one measurement alone.
Common mistakes that lead to the wrong size
- Using height only and ignoring inseam.
- Buying the size the brand label suggests instead of checking geometry.
- Forgetting to measure with the shoes you actually ride in.
- Choosing a frame with almost no clearance because it “looks pro.”
- Choosing an oversized frame and assuming saddle height can fix everything.
- Skipping a test ride and not checking how easy it is to stop, dismount, and start again.
The biggest error is assuming that a bike that fits on paper will also feel right in traffic, on climbs, or at the end of a long ride. Real-world use exposes bad sizing quickly, and the top tube is usually the first place that problem shows up.
How I would choose between two sizes that both seem close
When two sizes both pass the clearance test, I start with riding style. If you want a more playful, nimble feel, I usually lean smaller. If you want more stability for long rides, bikepacking, or steady climbing, I lean larger, as long as the bigger frame still leaves enough room over the top tube.
Then I check whether the bike can be adjusted in a sensible way. A slightly shorter stem or a modest handlebar change is normal. A huge stack of spacers, an extremely long stem, or a saddle pushed all the way forward is usually a warning sign that the frame is not the cleanest match.
If you are buying for commuting or stop-and-go city riding, I would be conservative and favor easier mounting and dismounting over a marginally longer cockpit. If you are choosing a trail bike, I would be more willing to ignore generous clearance and focus on how the bike handles when standing and moving around the bike.
The sizing check I trust before I buy
When I narrow a bike down, I run the same sequence every time. Measure inseam. Compare it to the published frame geometry. Check that the clearance is comfortable in the riding shoes I will use. Then confirm that reach, stack, and handlebar position match the kind of riding I actually do.
- If the stand-over gap is too tight, move to the next smaller frame.
- If the gap is generous but the cockpit feels cramped, compare the next size up.
- If the frame fits your inseam but not your posture, keep shopping.
- If both sizes work, let terrain and riding style decide.
That process is simple, but it prevents most sizing mistakes. It also keeps you from overvaluing one measurement that was never meant to carry the whole decision.
What matters most when the frame is close enough
Once the stand-over check is passed, the best choice usually comes down to handling and comfort over the rides you actually plan to do. A safe fit should feel confident when you stop, easy to mount, and natural once you start pedaling. If a bike gives you that, you are in the right range. If not, the frame size is probably still off even if the catalog numbers look fine.
The practical takeaway is simple: use clearance to eliminate bad options, then use geometry and riding position to pick the winner. That approach is more reliable than chasing one perfect number, and it usually leads to a bike you will enjoy riding, not just one that looks good on paper.