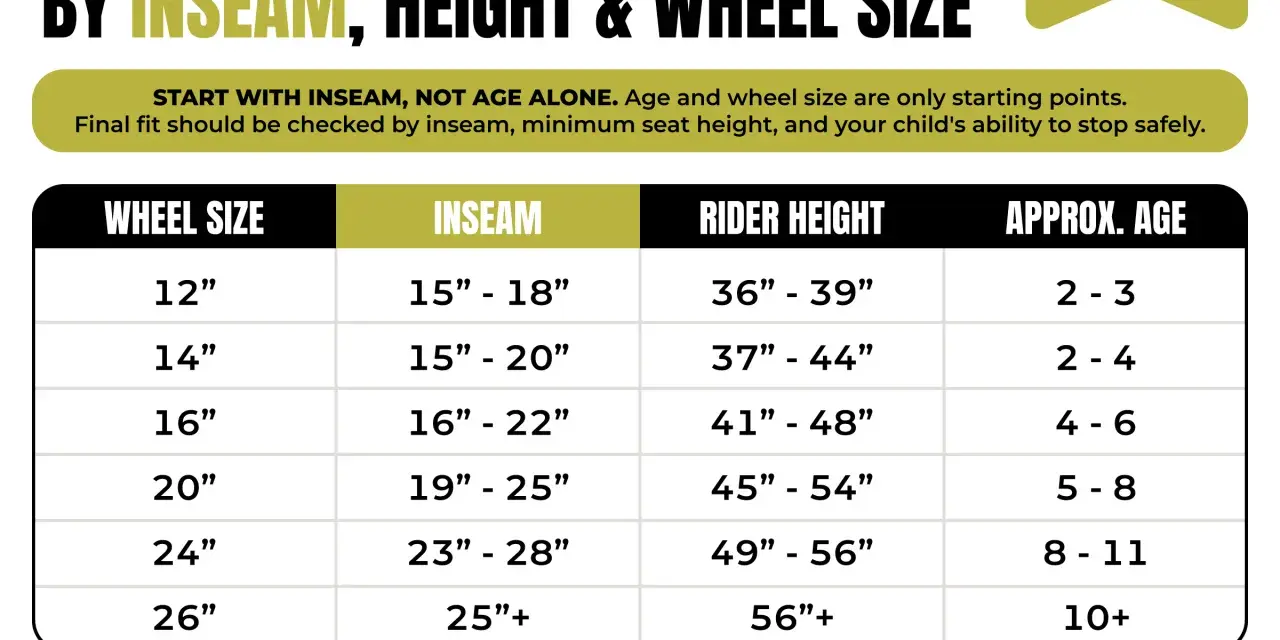
Choosing a child’s bike is really about fit, not guesswork. The bike size chart kids need starts with inseam, not age, because the right wheel size is the one that lets a rider start, stop, and steer with confidence today. In this guide, I break down the sizing logic, the practical measurement steps, and the fit checks I trust before I recommend a bike.
Use inseam, not age, to narrow the right bike fast
- Age is only a rough guide; height and inseam tell you much more.
- Kids’ bikes are usually sold by wheel diameter, from 12 inches to 26 inches.
- A child should be able to straddle the bike with a small amount of clearance.
- If a child is between sizes, I usually lean smaller for newer riders.
- Match the bike style to where they ride most, not just to the number on the wheel.
- Brand charts vary, so the manufacturer’s own sizing guide should always have the final say.
Why age is only a rough clue
Age can get you in the neighborhood, but it does not tell you enough to buy with confidence. Two seven-year-olds can be separated by several inches of leg length, and that difference matters more than most parents expect. That is why I treat age as a starting bracket, not the decision-maker.
REI and Trek both frame kids’ sizing this way: use age and height to narrow the options, then check inseam for the real fit. That approach makes sense because wheel size alone does not guarantee comfort. A bike that looks “close enough” on paper can still feel awkward if the rider cannot plant a foot, clear the top tube, or reach the controls without stretching.
For most families, the useful mental shift is simple: buy for current control, not future growth. A bike that is too big slows learning, makes starts and stops messy, and often creates the exact hesitation you were trying to avoid. Once you think in those terms, the chart becomes a tool instead of a gamble, and the next step is knowing which chart numbers matter most.
The size chart that actually helps
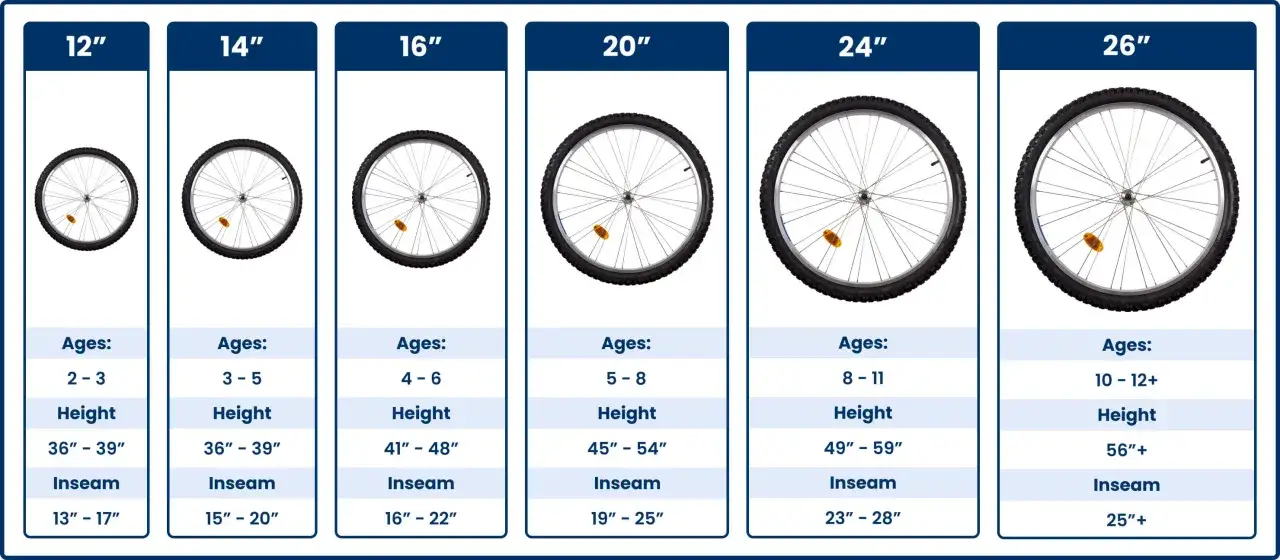
The most useful chart is the one that combines wheel size, height, and inseam. The ranges below are common starting points in the U.S. market, but individual brands can run slightly smaller or larger, so I always compare these numbers with the brand’s own chart before deciding.
| Wheel size | Typical height | Typical inseam | Usual age range | Best fit for |
|---|---|---|---|---|
| 12 in. | 2'10"–3'4" | 14"–17" | 2–3 years | First rides, balance bikes, very small pedal bikes |
| 14 in. | 3'1"–3'7" | 16"–20" | 3–4 years | Small riders who are ready for a little more stability |
| 16 in. | 3'7"–4'0" | 18"–22" | 4–6 years | Most first pedal bikes and easy neighborhood riding |
| 20 in. | 4'0"–4'5" | 22"–25" | 5–8 years | Kids who are moving past starter bikes and want more range |
| 24 in. | 4'5"–4'9" | 24"–28" | 7–11 years | Taller kids who still need a youth bike fit |
| 26 in. | 4'9"+ | 28"+ | 10+ years | Older kids who may also fit the smallest adult bikes |
One detail matters more than most people realize: some brands split the 20-inch category into small and large versions, so two bikes with the same wheel diameter can fit differently. That is normal, not a mistake. If the numbers place a child near the edge of two sizes, I use the rest of the fit process to decide, and that starts with a proper inseam measurement.
How I measure a child at home
If you only measure one thing, measure inseam. It is more useful than pant size, and it is usually more useful than age when you are choosing a bike. I also like to measure height, but inseam tells me whether the rider can get on, off, and stop the bike without feeling trapped by it.
- Have the child stand barefoot or in the shoes they will actually wear most often.
- Stand them against a wall with feet about shoulder-width apart.
- Place a hardcover book between the legs, spine up, and press it gently upward to mimic the saddle contact point.
- Mark the wall at the top of the book spine.
- Measure from the floor to the mark. That number is the inseam.
Once you have the inseam, the chart becomes much easier to read. A child with a 16-inch inseam, for example, may fit more than one wheel size, which is normal; the lower end may feel easier to manage, while the larger option may feel more stable once they are already confident. My bias is to choose the bike that lets the child place a foot down quickly and move the bike around without effort.
If you are buying online, this measurement is also what keeps you from over-sizing. A bike that looks slightly larger can become a problem fast if the child cannot start smoothly or stand over it comfortably. Once the numbers are in hand, the next question is what kind of bike they will actually ride.
Match the bike to the way they ride
Wheel size matters, but it does not tell the whole story. A child who rides on sidewalks needs a different setup from a child who spends weekends on gravel paths or dirt loops. I try to match the bike to the terrain first, then confirm the size second.
| Bike style | Best for | Why it works | What to watch for |
|---|---|---|---|
| Balance bike | First-time riders learning balance and steering | No pedals, so kids can focus on control without managing crank arms | Seat should stay low enough for flat-foot confidence |
| First pedal bike | Children ready to add pedaling after balance practice | Helps make the transition to pedaling feel simple instead of intimidating | Keep the fit compact; too much reach makes starting awkward |
| Cruiser | Neighborhood rides and paved paths | Upright posture, comfort, and easy handling | Good choice only if the child will mostly ride on smooth surfaces |
| Mountain bike | Trail use, dirt, gravel, and rougher terrain | Knobby tires, stronger brakes, and a more stable off-road setup | Useful only if the child really needs trail features, because extra hardware adds weight |
There is also a skill issue hidden inside this choice. A lot of children do better on a balance bike first, because it teaches balance before pedaling ever enters the picture. That can shorten the learning curve and even remove the need for training wheels altogether. Once the riding style is matched, I move to the part that catches most sizing mistakes: the actual fit on the bike.
The fit checks I never skip
Even the right wheel size can feel wrong if the bike is set up badly. My fit check is short, but I never skip it. The first thing I look at is standover height: the child should be able to stand over the bike with a little space between their body and the top tube. An inch or two of clearance is a practical target for most kids’ bikes.
Next I check seat height. For a balance bike or a first pedal bike, the child should be able to put both feet flat on the ground while seated. Once they are comfortable on pedals, only the toes need to touch, and the knees should still have a slight bend rather than feeling jammed up toward the handlebars. If the child has to rock side to side to start moving, the bike is usually too tall or too long.
I also watch the reach to the bars and brakes. A child should not have to stretch forward to steer or squeeze the levers. If they do, the bike may technically fit by wheel size but still be the wrong choice. In practical terms, I want the rider to feel like they can stop, restart, and dab a foot without thinking about it. That is the difference between a bike that gets used and one that sits in the garage.
One useful rule of thumb: for a first pedal bike, the saddle is often close to inseam height; for a more confident rider, the seat can sit a little higher. On a balance bike, the saddle usually sits lower so the child can push and glide with control. Those are starting points, not rigid laws, but they are a better guide than guessing from age alone.
The last checks I make before buying online
If I cannot test the bike in person, I try to reduce the risk in three ways. First, I compare the manufacturer’s chart with the child’s height and inseam instead of trusting one number on its own. Second, I read the geometry notes, because two bikes with the same wheel size can still have very different standover height and reach. Third, I avoid the “buy bigger so they can grow into it” trap.
That last point matters more than people think. A slightly oversized kids’ bike often feels heavy, top-heavy, and hard to maneuver, especially for beginners. A bike that fits today may not last as long on paper, but it usually gives a child more confidence, which means more riding time and fewer frustrations. In my experience, that is a better tradeoff almost every time.
So if you are choosing between two sizes, start with the smaller one unless the child is already experienced, has strong reach and balance, and still clears the frame comfortably. If they are nervous, new to pedaling, or just between measurements, the smaller bike is usually the smarter buy. That is the practical rule I would use for a first bike, a hand-me-down replacement, or an online order you want to get right the first time.
Choose the size that fits now, confirm it with inseam and standover, and then match the bike to the way the child will actually ride. That is the simplest way to turn a chart into a bike that feels easy, safe, and worth taking out again tomorrow.