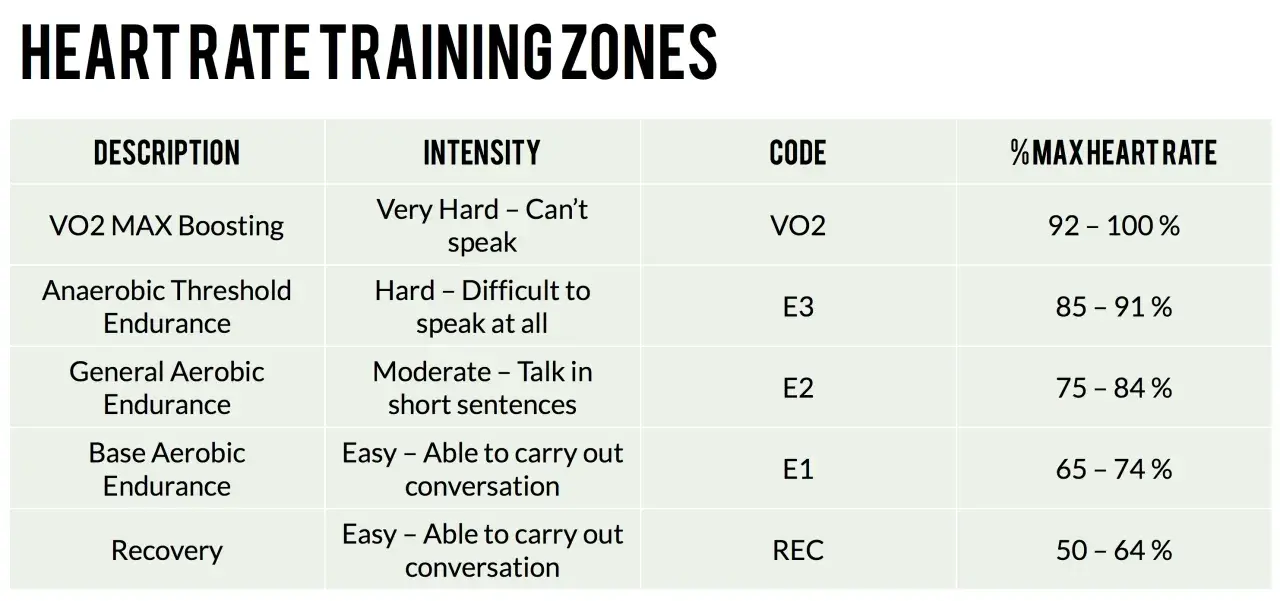
Heart-rate zones turn raw bpm data into something you can actually train with. They help you decide when to recover, when to build endurance, and when to push hard enough to improve without turning every ride into a race. For cyclists, that matters because the same effort can serve very different purposes depending on which zone you spend time in.
The practical answer is that most training systems use five heart-rate zones, although some coaches compress them into three or four and some platforms split them more finely. The exact count matters less than understanding what each zone is for and how to use it on the bike.
The practical answer at a glance
- Most heart-rate training plans use five zones based on a percentage of maximum heart rate.
- Lower zones support recovery and aerobic base; higher zones build speed, threshold power, and race sharpness.
- The old 220 minus age formula is only a starting point, not a precise measurement.
- Heart rate lags behind effort during short intervals, so breathing, power, and perceived exertion still matter.
- For cyclists, zone 2 is the workhorse for endurance, while zones 4 and 5 are where the hard adaptations happen.
Why the answer is usually five zones
I think of the zone count as a coaching choice, not a law of nature. A beginner plan may use three broad buckets, a standard cycling plan often uses five, and a more detailed system may add even more nuance for athletes who want tighter control.
The reason for the variation is simple: different systems measure intensity in different ways. Some use maximum heart rate, some use lactate threshold, and some blend heart rate with perceived effort. That is why two training plans can label the same effort differently and still both be reasonable.
| System | How it groups effort | Why people use it | Best fit |
|---|---|---|---|
| 3-zone model | Easy, moderate, hard | Simple and easy to follow | Beginners and general fitness |
| 5-zone model | Recovery through maximal effort | Enough detail for structured training | Cyclists and endurance athletes |
| 6-zone or more detailed model | Breaks threshold and interval work into finer steps | More precision for advanced planning | Riders who track training closely |
For most riders, five zones are the sweet spot: detailed enough to guide training, but not so granular that you spend more time decoding numbers than riding. Once that makes sense, the next step is seeing what each zone actually feels like.
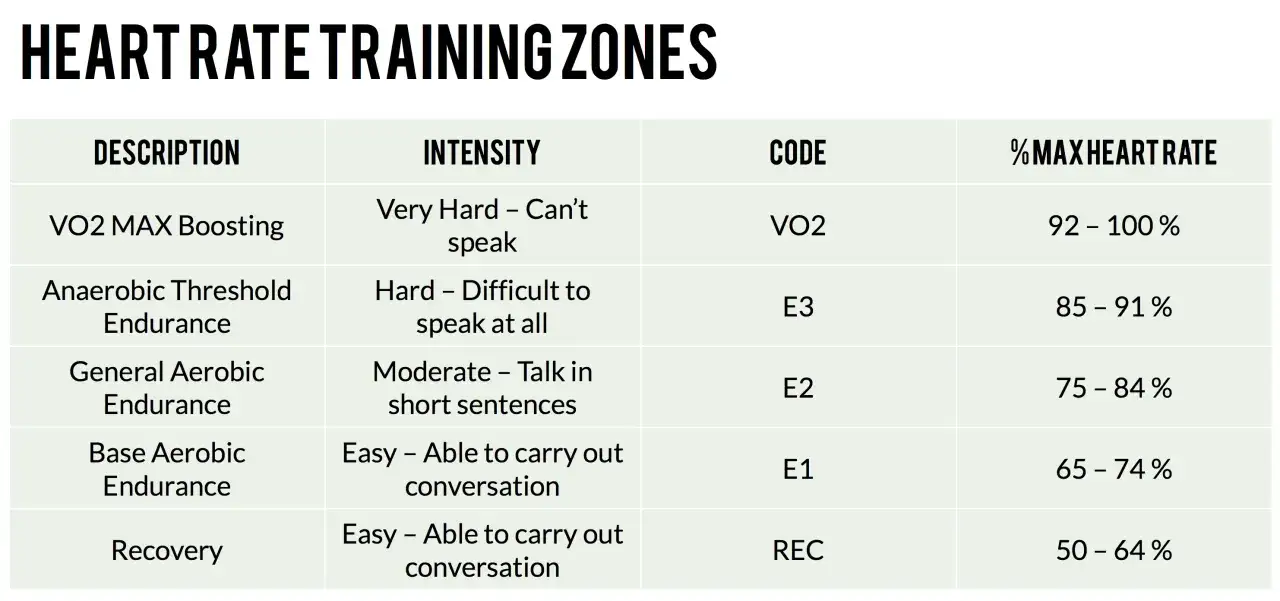
The five-zone model and what each one is for
Below is the most common five-zone setup I use as a reference. The exact percentages can shift a little from one coach or app to another, but the overall structure stays the same. Use these as starting points, not as sacred boundaries.
| Zone | % of max heart rate | How it feels | What it trains | Cycling example |
|---|---|---|---|---|
| Zone 1 | 50% to 60% | Very easy, relaxed breathing | Recovery, warm-up, circulation | Easy spin after a long ride |
| Zone 2 | 60% to 70% | Comfortable, steady, conversational | Aerobic base, endurance, efficiency | Long steady ride on rolling roads |
| Zone 3 | 70% to 80% | Steady but clearly working | Tempo, stamina, sustained pacing | Long climb or hard group pace |
| Zone 4 | 80% to 90% | Hard, controlled, breathing is deep | Threshold, speed endurance | Repeated 10- to 20-minute efforts |
| Zone 5 | 90% to 100% | Very hard, near-maximal | VO2 max, sprint power, top-end fitness | Short hill repeats or all-out sprints |
Zone 2 gets the most attention because it is sustainable and productive, but zones 4 and 5 are where you sharpen race fitness. The whole point is balance, not living in one zone forever, which is why the next question is how to find your own numbers instead of guessing.
How I would estimate your zones without a lab test
The easiest place to start is maximum heart rate. The familiar 220 minus age formula gets you in the ballpark, but it is not exact. Two riders of the same age can differ by well over 10 beats per minute, and sleep, stress, heat, medication, and training history can all move the result around.
I treat that estimate as a rough draft. Then I compare it with how the effort feels on the bike. In zone 2, you should still be able to talk in full sentences. In zone 3, speech becomes shorter and more deliberate. In zone 4, you are usually down to a few words at a time. That simple talk test catches a surprising number of bad estimates.
Use a hard steady effort to refine the picture
If you ride regularly, a sustained hard effort is more useful than a generic age formula. A threshold-style ride shows where your upper sustainable range sits, which helps you set zones that reflect your actual fitness instead of a textbook average.
Read Also: Swollen Knee and Cycling - Ride Smart, Heal Faster
Use the right sensor for the job
For steady endurance rides, a wrist monitor is often good enough. For intervals, I prefer a chest strap because heart rate lags behind effort and wrist sensors can be thrown off by motion, sweat, and arm position. If your data looks jumpy or delayed, the issue may be the sensor, not your fitness.
If you take medication that changes heart rate or you are returning after illness or a long layoff, be more cautious with the numbers. Zones still help, but they should be checked against how you feel, not treated like a medical verdict. Once the numbers are anchored, the real value is in using them to shape actual rides.
What cyclists should do in each zone
For cycling, the zones are most useful when they match the kind of adaptation you want. I like to think about them as tools with different jobs rather than difficulty levels to collect.
| Training goal | Main zone or zone mix | Why it works | Common mistake |
|---|---|---|---|
| Recovery | Zone 1 | Moves blood, reduces stiffness, keeps load low | Riding too hard and ruining recovery |
| Aerobic base | Mostly Zone 2 | Builds endurance, efficiency, and fatigue resistance | Going too hard because it feels “too easy” |
| Tempo and long climbs | Zone 3 | Improves sustained pacing and muscular stamina | Living here on every ride and never recovering fully |
| Threshold work | Zone 4 | Raises the pace you can hold before fatigue spikes | Starting too hard and fading early |
| VO2 max and sprint work | Zone 5 | Challenges top-end aerobic capacity and peak power | Doing too much volume at this intensity |
Zone 3 deserves special mention because it is the classic gray area. It is useful, especially on hilly rides or long group efforts, but it can quietly become the place where too much training ends up. You work harder than easy endurance, yet not hard enough to get the full benefit of threshold or VO2 sessions. That is why I treat it as a tool, not a default.
For most cyclists, a good week usually includes a lot of zone 2, a little zone 4 or 5, and just enough zone 3 to support the specific ride demands you care about. That only works if you avoid the usual traps, which is where many plans lose value.
The mistakes that make heart-rate zones less useful
- Using one age formula forever. It is fine as a starting point, but not as a permanent ceiling on your training.
- Forcing every ride into a perfect zone. Real rides include stops, hills, wind, fatigue, and traffic. Your data should guide you, not bully you.
- Ignoring heat and dehydration. On hot days, heart rate often rises at the same power output, so zone boundaries can look higher than normal.
- Trusting heart rate too much on short intervals. HR responds slowly, so a 30-second sprint may finish before the monitor catches up.
- Spending too much time in the middle. Zone 3 has a place, but if it dominates every session, recovery suffers and progress often stalls.
The fix is usually boring but effective: track a few variables together, not just one. I like heart rate plus power when available, or heart rate plus pace and perceived effort when it is not. That combination gives you a clearer picture than any single number can provide, and it sets you up for one last practical question: how to keep the system simple enough to use every week.
What I would tell a cyclist before trusting the numbers
Start with one zone model and stay with it long enough to learn its patterns. If you keep changing formulas, sensors, and apps, you never build a stable reference point. I would rather see a rider use a decent five-zone setup consistently for six weeks than bounce between three different systems every ride.
- Recheck your zones after illness, a long break, a major fitness gain, or a big change in body weight.
- Use zones to control effort on long rides, not to chase a perfect bpm number every minute.
- On interval days, let power or perceived effort lead and heart rate confirm the trend.
- On endurance days, use heart rate to keep you honest when your legs feel better than they should.
So, the real answer is straightforward: most riders work with five heart-rate zones, but the best system is the one that matches your body, your sensor, and your training goal. Keep it simple, check it against real rides, and use the zones to make better decisions rather than more complicated ones.