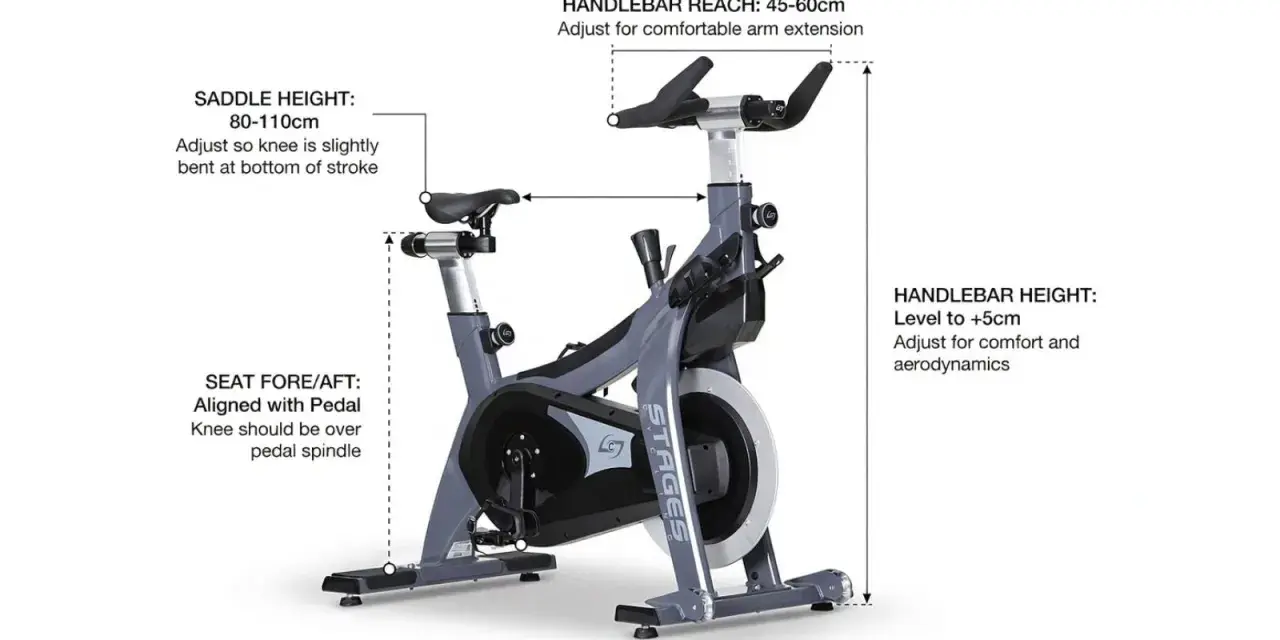
Getting a spin bike dialed in is less about chasing a perfect number and more about matching the machine to your body. Set the saddle first, then the handlebars, then the pedals and resistance so the ride feels stable instead of forced. When the fit is right, your knees track cleanly, your back stays calmer, and indoor cycling starts to feel efficient instead of awkward.
The fit points that matter most before you ride
- Start with the saddle because seat height and fore-aft position shape every other contact point.
- A good first target is a slight knee bend at the bottom of the pedal stroke, not a locked leg or a deep crouch.
- Handlebars should support a neutral spine; for most riders, level with the saddle is a useful starting point.
- Feet need to stay stable on the pedals, with the ball of the foot centered over the axle or cleat.
- Use enough resistance to keep the flywheel controlled; spinning with almost no load usually feels sloppy and unstable.
- Record the final settings if the bike allows it, so you can repeat a fit that actually works.
Set the saddle first because it determines the whole fit
I start every bike setup with the saddle because it has the biggest effect on comfort and power. If the seat is wrong, you will feel it in your knees, hips, and lower back long before the workout is over. A good starting point is to stand next to the bike and set the top of the saddle roughly in line with your hip bone, then fine-tune from there.
Once you sit down, use the bottom of the pedal stroke as your main check. Place one heel on the pedal at 6 o'clock; your leg should be almost straight without forcing your pelvis to rock. When you ride normally with the ball of the foot on the pedal, that usually turns into a slight knee bend, which is what you want. If your hips bounce, the saddle is probably too high. If your knees stay too bent and the front of the thighs burn early, it is probably too low.
Fore-aft position matters just as much as height. Fore-aft means moving the saddle toward or away from the handlebars. With the cranks level, I like to see the front knee close to the pedal axle rather than drifting far forward. Make only one small change at a time, usually 3 to 5 mm, then test again for a minute or two. That is how you avoid chasing the wrong fix. Once the saddle is stable, the handlebars become much easier to judge.
Place the handlebars to support your spine, not your ego
Handlebar height is where many riders overthink style and underthink comfort. For indoor cycling, I care less about looking aggressive and more about whether the chest can stay open, the shoulders can stay down, and the lower back can hold a neutral curve. A good rule for most home riders is to start with the bars level with the saddle or slightly higher, then adjust only if your body clearly asks for more or less reach.
| Rider situation | Good starting point | Why it works |
|---|---|---|
| Beginner or back-sensitive rider | Bars level with the saddle or 1 to 2 inches higher | Reduces pressure on the lower back, neck, and hands |
| Typical recreational rider | Bars around saddle height | Gives a balanced position for steady rides and classes |
| Flexible, experienced rider | Bars slightly below saddle height | Can open the hip angle and feel more athletic without collapsing the torso |
I usually tell riders to ignore the urge to drop the bars too low too soon. If your shoulders creep up, your wrists bend back, or your neck starts to crane forward, the front end is too low or too far away. Raise the bars first, then reassess reach. A comfortable upper body lets the legs do the work, which is exactly what you want before you start thinking about effort or cadence.
Match pedals, shoes, and resistance to the way you ride
Pedals are where setup becomes real. Your foot should stay stable, because a foot that slides around wastes force and creates sloppy knee tracking. If the bike uses toe cages, place the ball of the foot over the center of the pedal and snug the strap so the foot does not lift, but does not go numb either. If the bike uses clipless pedals, the cleat usually belongs under the ball of the foot, with enough tension to stay secure and release without drama.
Shoe choice matters more than people expect. A shoe with a firmer sole feels more predictable than a soft running shoe because it does not collapse under pressure. If you ride in standard sneakers, keep the laces tight and the heel locked down. I also like riders to check that the ankle can stay relaxed; if you are reaching for the pedal with your toes, the saddle is often too high or the resistance is too low.
Resistance is not just a workout variable, it is part of the setup. A bike with almost no resistance can feel twitchy, while too much resistance forces the knees to grind. The sweet spot is a controlled pedal stroke where the flywheel carries smoothly and your hips stay quiet. On many bikes that means adding resistance in small quarter-turns or click by click until the pedal stroke stops feeling bouncy. If you want a simple rule, use enough load that you can spin cleanly without slamming into the top or bottom of the stroke.
Once the feet and resistance are sorted, the next question is whether the whole setup still works once you start moving.
Use the first five minutes to verify the setup in motion
I trust a moving check more than a static one. A bike can look right while standing still and still feel wrong after 90 seconds of pedaling. Start with an easy warm-up and pay attention to the parts of the body that try to compensate: shoulders, lower back, hips, and knees. If one of those areas starts working harder than the legs, the fit needs a small correction.
- Spin lightly for one minute and keep your shoulders relaxed.
- Look for quiet hips. If they rock, the saddle is probably too high.
- Watch the knees from the front. They should track roughly straight rather than diving inward or flaring out.
- Check your hands and neck. Numb hands or a strained neck usually mean too much weight is sitting on the bars.
- After two or three minutes, adjust only one thing, then retest.
A useful cadence target for a steady indoor ride is often somewhere around 80 to 90 rpm, but cadence matters less than control. If your stroke starts to bounce at that speed, add a little resistance. If your legs feel trapped and slow, reduce it slightly. The ride should feel smooth enough that you can focus on breathing and position instead of fighting the bike.
The mistakes that create pain fast
Most spin bike problems are not mysterious. They come from a handful of predictable setup errors, and they usually show up as discomfort long before they turn into a full workout issue. When I troubleshoot a fit, I look at symptom first, adjustment second.
| What you feel | What is probably wrong | What to change first |
|---|---|---|
| Hips rocking side to side | Saddle is too high | Lower the saddle a small amount and retest |
| Front of the knee feels jammed | Saddle is too low or too far forward | Raise the saddle slightly or move it back |
| Lower back rounds or tightens up | Bars are too low or the reach is too long | Raise the handlebars before changing anything else |
| Hands go numb or shoulders creep upward | Too much body weight is on the handlebars | Shorten the reach and soften the elbows |
| Pedal stroke feels jumpy | Resistance is too light | Add a little load until the flywheel feels controlled |
There is one more mistake I see all the time: changing every setting at once. That makes the real problem impossible to identify. Adjust the saddle first, then the bars, then the pedals, and only after that start refining resistance. Small, isolated changes save time and protect your joints. Once you learn that pattern, setup becomes quick instead of frustrating.
Save the fit that works so your next ride starts better
The best indoor cycling setup is the one you can repeat. If your bike has numbered posts or marks, write them down after you find a fit that feels good. I keep four numbers in mind for any home bike: saddle height, saddle fore-aft, handlebar height, and a baseline resistance setting for easy riding. That makes tomorrow’s session feel familiar instead of like a new experiment.
- Recheck the fit after new cycling shoes or pedals.
- Revisit it if you change your training volume, because flexibility and comfort can shift with more riding.
- Adjust again after any knee, hip, back, or wrist irritation that lasts beyond a short ride.
- Compare your setup if more than one person uses the same bike, because the right numbers are personal.
If I had to reduce the whole process to one principle, it would be this: fit first, intensity second. A well-set spin bike lets you train hard without feeling cramped, and that is the difference between a ride you tolerate and one you will actually repeat.