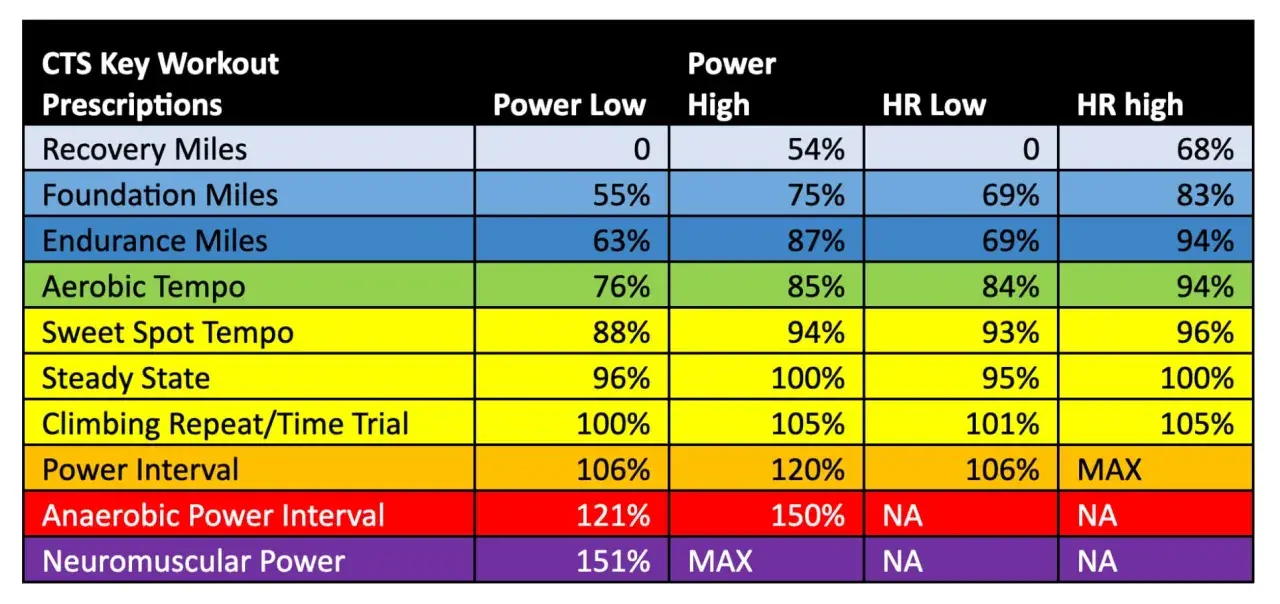
Heart rate training works best when I use it to control effort, not to chase numbers for their own sake. It turns a vague ride or workout into a clear session: easy aerobic work, tempo, threshold, or recovery. For cyclists, that matters because wind, hills, heat, and fatigue can all distort pace, while heart rate gives a cleaner read on how hard the body is actually working.
The practical rules that matter most before your next ride
- Start with a realistic max heart rate and a true resting heart rate, then build your zones from there.
- Use heart rate for steady efforts; use power, pace, or perceived effort when intervals are too short for the monitor to catch up.
- Zone 2 should feel sustainable, not forced or “kind of hard.”
- Heat, dehydration, fatigue, caffeine, and medication can change your numbers, so the same bpm does not always mean the same effort.
- A chest strap is usually the better choice for cycling intervals if you want cleaner data.
Why heart-rate zones beat guessing on most days
I like zone-based training because it removes the biggest trap in fitness work: poor self-assessment. Most riders are either too conservative on hard days or too ambitious on easy days, and both mistakes slow progress. Heart-rate zones give you a rough ceiling and floor for each effort, so you can stay honest when motivation, terrain, or ego starts interfering.
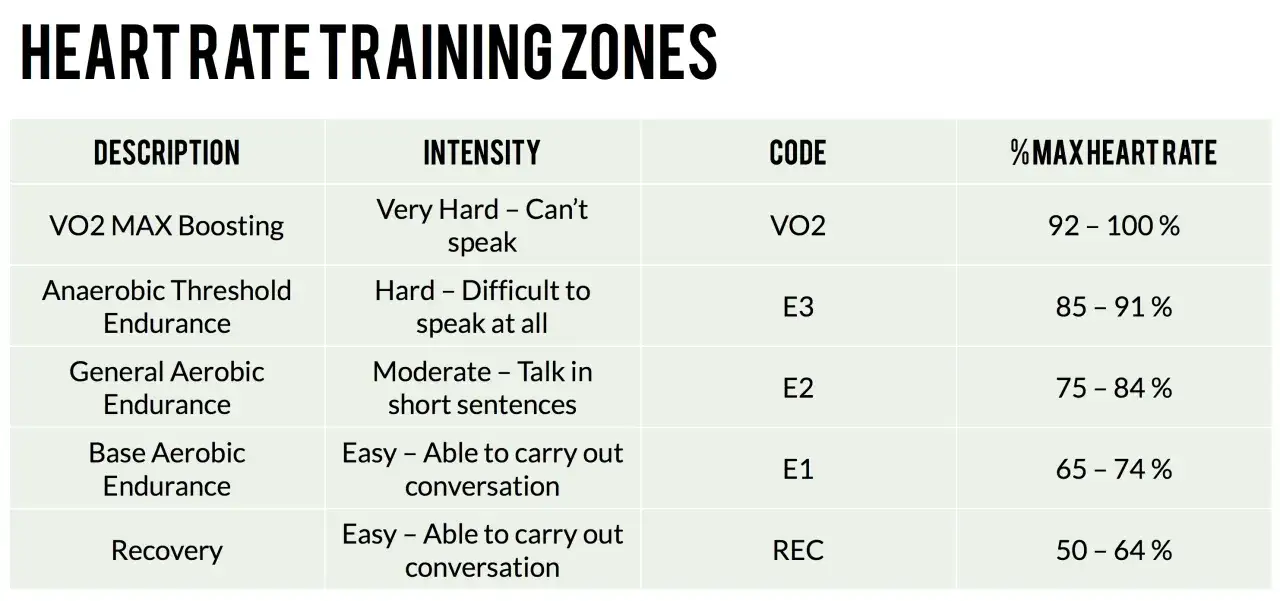
The American Heart Association’s broad ranges are a useful starting point: moderate exercise usually sits around 50% to 70% of maximum heart rate, while vigorous work lands around 70% to 85%. That is not a perfect prescription, but it is enough to distinguish a recovery spin from a real aerobic session. I treat those bands as a framework, then refine them with real-world data from my own rides.
That approach also lines up with the basic weekly guidance most people know: about 150 minutes of moderate aerobic activity or 75 minutes of vigorous work. Once that anchor is clear, the next step is making sure your zones are actually yours, not just generic estimates.
How to set your zones without overcomplicating it
There are a few ways to do this, and I would not pretend they are all equally useful. The old 220-minus-age formula is easy, but it is crude. Mayo Clinic also uses 208 minus 0.7 times age, which is still an estimate but usually a little more practical. For a 40-year-old, that puts maximum heart rate at about 180 beats per minute, give or take.
From there, I prefer heart rate reserve, or HRR, because it includes resting heart rate. Mayo Clinic points to that method as a more personal way to build target ranges. Here is the simple version:
HRR = max heart rate - resting heart rate
Target heart rate = resting heart rate + (HRR × desired intensity)
If your estimated max is 180 and your resting HR is 60, your HRR is 120. Zone 2 at 60% to 70% of HRR would land around 132 to 144 bpm. That range often fits endurance riding better than a one-size-fits-all age chart because it reflects where your body starts from, not just how old you are.
| Method | What it gives you | Best use | Watch out for |
|---|---|---|---|
| Maximum heart rate | A fast starting point | First-pass zone setup | Can be far from your real ceiling |
| Heart rate reserve | More personal ranges | Steady aerobic work | Depends on an accurate resting HR |
| Talk test | Immediate effort check | Easy and moderate rides | Less precise on hard efforts |
| RPE | How hard it feels | Heat, fatigue, no device | Takes practice to interpret well |
My rule is simple: use HRR for steady endurance rides, use the talk test for quick reality checks, and use perceived effort when the environment is messy or the sensor is unreliable. Once the numbers are set, the real value comes from knowing what each zone is for.
What each zone should actually feel like
Zone labels vary a bit by coach, app, and sport, so I do not treat any single chart as sacred. Still, the physiology is consistent enough to make a common five-zone model useful. The lower zones build aerobic durability, the middle zones improve sustainable speed, and the upper zones are for short, hard efforts that you cannot hold for long.
| Zone | Approximate effort | Typical use | How it should feel |
|---|---|---|---|
| 1 | Below roughly 60% of max HR | Recovery, warm-up, cool-down | Very easy, almost underworked |
| 2 | Roughly 60% to 70% | Endurance, base building | Steady, comfortable, repeatable |
| 3 | Roughly 70% to 80% | Tempo, rolling terrain | Controlled work, conversation shortens |
| 4 | Roughly 80% to 90% | Threshold intervals, climbs | Hard but manageable in blocks |
| 5 | Above roughly 90% | Sprints, VO2max reps | Very hard and short |
Zone 2 is the one most riders misunderstand. It should not feel like a half-hearted effort, but it also should not feel like a disguised race. If I can keep it going for a long time, breathe in a controlled way, and finish fresher than I started, I am usually in the right neighborhood. That matters even more on the bike, where the same numbers can behave differently depending on speed, terrain, and cooling.
How cyclists should use the numbers on real rides
Cycling exposes one of the biggest weaknesses of heart-rate data: lag. If I launch into a one-minute surge, the number on the screen may still be climbing when the rep is already half over. That is why I rarely use heart rate alone to execute short intervals. Power, pace, or cadence should lead there, and heart rate should confirm the workout afterward.
For longer endurance rides, heart rate becomes much more useful. I pay attention to the middle of the ride, not just the first 10 minutes, because the body settles into a truer pattern once the warm-up is done. On long climbs, in hot weather, or after several hard days in a row, a rising heart rate at the same power is often the first sign that the session is getting more expensive than it should.
- Use a chest strap for intervals if you want the cleanest data on the bike. Wrist sensors can lag, drift, or get noisy when your position changes.
- Expect heat to push heart rate up even when speed or watts stay the same. That is normal, not automatically a bad sign.
- Pay attention indoors. Better cooling usually lowers heart rate at the same workload, which is why a poor fan setup can make trainer rides look harder than they really are.
- Watch climbing separately from flat riding. A steep road demands a different rhythm, so the heart-rate response can spike sooner than it does on a steady flat route.
That is the point where the numbers become genuinely useful instead of just decorative. Once you know how they behave on the bike, you can avoid the most common mistakes that make the data misleading.
The mistakes that make heart-rate data useless
The biggest error I see is treating one workout like a verdict. A hot day, poor sleep, dehydration, caffeine, stress, or a heavy training block can all push heart rate around. If I chase the same bpm without asking what changed, I end up reading the wrong story.
- Using the same target every day when conditions are clearly different.
- Starting too hard and spending the entire ride above the intended range.
- Letting heart rate replace all other feedback instead of using it alongside power, pace, and feel.
- Trusting bad sensor data, especially from loose wrist monitors during hard efforts.
- Ignoring medication effects. If something like a beta blocker changes your pulse response, standard zones may no longer mean what they used to mean.
- Forgetting that fatigue accumulates. A stable zone on fresh legs may feel completely different after three hard days.
There is also a quiet mistake that matters a lot: skipping the warm-up. If I go straight from zero to a target zone, the heart rate response is messy and misleading. A clean 10 to 15 minute ramp makes the rest of the session far easier to interpret, and it prepares the body to do the work properly.
A simple week that balances endurance and intensity
If the goal is better fitness without turning every ride into a test, I prefer a week that mixes mostly aerobic work with one focused harder session. That is enough for a lot of recreational cyclists to make real progress, especially when life, work, and recovery all compete for time. You do not need to be in the pain cave five days a week to see improvement.
| Day | Session | Why it works |
|---|---|---|
| Monday | Rest or 30 minutes in Zone 1 | Lets the body absorb the previous week |
| Tuesday | 4 x 8 minutes in Zone 4, with easy recovery between reps | Builds threshold and repeatable hard effort |
| Wednesday | 45 to 60 minutes in Zone 2 | Supports aerobic base without extra stress |
| Thursday | 60 to 90 minutes mostly in Zone 2 | Adds volume and durability |
| Friday | Off or strength work | Improves resilience off the bike |
| Saturday | 90 to 180 minutes mostly in Zone 2 | Teaches pacing and endurance |
| Sunday | Recovery spin or short tempo blocks | Keeps the week balanced and avoids stagnation |
If your time is tighter, two to three steady rides and one quality interval day can still move the needle. If you are new to structured training, I would rather see you complete a simple week consistently than build a complicated plan you cannot sustain. The final piece is knowing what to look for over several weeks, not just on a single ride.
What I watch over four weeks, not one workout
The best sign that the system is working is not one fast ride. It is a lower heart rate at the same pace or power, or more pace and power at the same heart rate, across several weeks. When I see that pattern, I know the aerobic system is adapting in a way that matters on the road.
I also watch for heart-rate drift on long rides. If the bpm keeps climbing while power stays flat, something in the environment or the recovery process is making that ride more expensive than it should be. Heat and dehydration are common culprits, but so are poor sleep, underfueling, and accumulated fatigue. That is useful information, not failure.
Every few weeks, I check whether the easy rides still feel easy, whether the harder sessions are landing where they should, and whether the same routes are starting to look less costly. If they are, the zones are doing their job. That is the real advantage of using heart-rate zones well: they keep the work honest without turning training into a numbers obsession, and they let the data support the ride instead of controlling it.