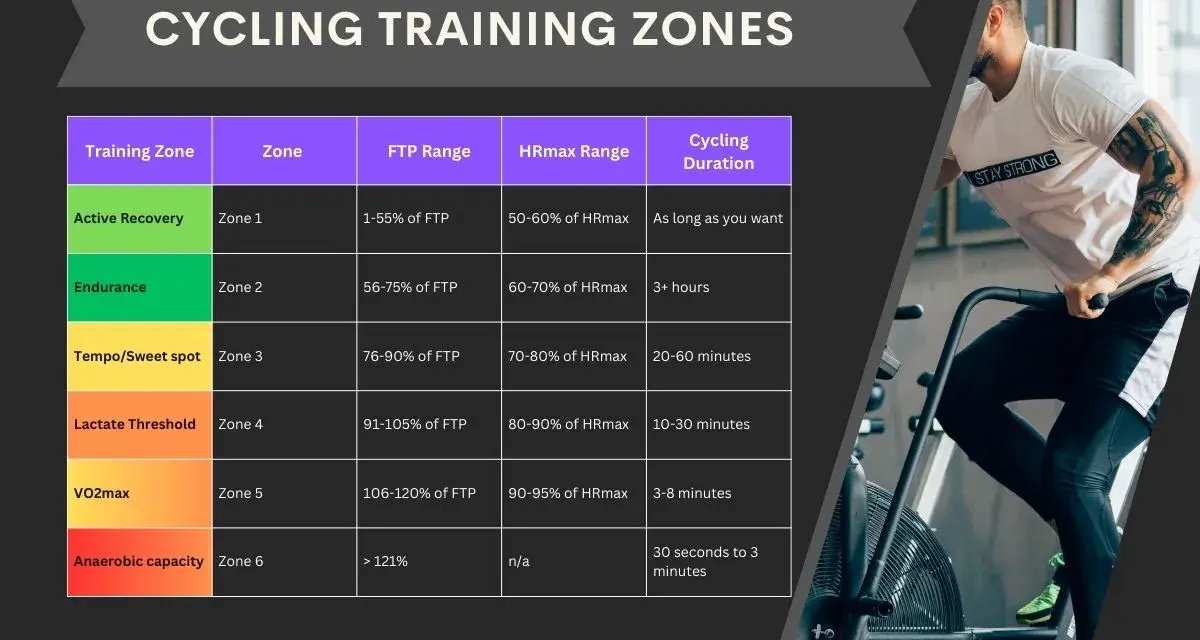
Workout zones are a practical way to match effort to the goal of a session, whether you want to build endurance, sharpen climbing, or recover without losing rhythm. I’m going to break down what the main intensity levels actually measure, how to set them with heart rate or power, and how to use them on the bike without turning every ride into a data chase. For cyclists, that distinction matters, because the right zone on a flat recovery spin is not the same as the right zone on a long hill repeat or a hot summer endurance ride.
What matters most before you build your zones
- Heart rate, power, and perceived effort all describe intensity, but they do not measure the same thing.
- The most useful zone system is the one that matches your workouts and your available tools.
- Easy aerobic work still does most of the heavy lifting for endurance, especially in cycling.
- Heart rate is useful for steady work, while power is sharper for intervals and pacing.
- Zones only help when they are based on your body, not on a generic chart copied from someone else.
What each intensity metric is really telling you
Zones are just ranges of effort, but the metric behind them changes the way you should read the workout. Heart rate tells you how hard your cardiovascular system is working, power tells you how much work you are producing at the pedals, and perceived exertion tells you how hard the effort feels right now. I like to think of those as three different lenses on the same ride: useful together, misleading when treated as interchangeable.
| Metric | What it measures | Best use | Main limitation |
|---|---|---|---|
| Heart rate | Internal strain and cardiovascular response | Steady endurance rides, recovery checks, long climbs | It lags behind changes in effort and is affected by heat, fatigue, hydration, and stress |
| Power | External work at the pedals | Intervals, pacing, threshold work, indoor training | It needs a power meter or smart trainer |
| Perceived exertion | How hard the session feels | Travel days, rides without sensors, reality-checking the numbers | It gets better with experience and honest self-assessment |
The biggest mistake I see is assuming one metric can replace the others. A good system uses at least two: power or heart rate for the target, and perceived effort as the sanity check. Once you understand that, the common zone models make a lot more sense.
How the five-zone model feels on the bike
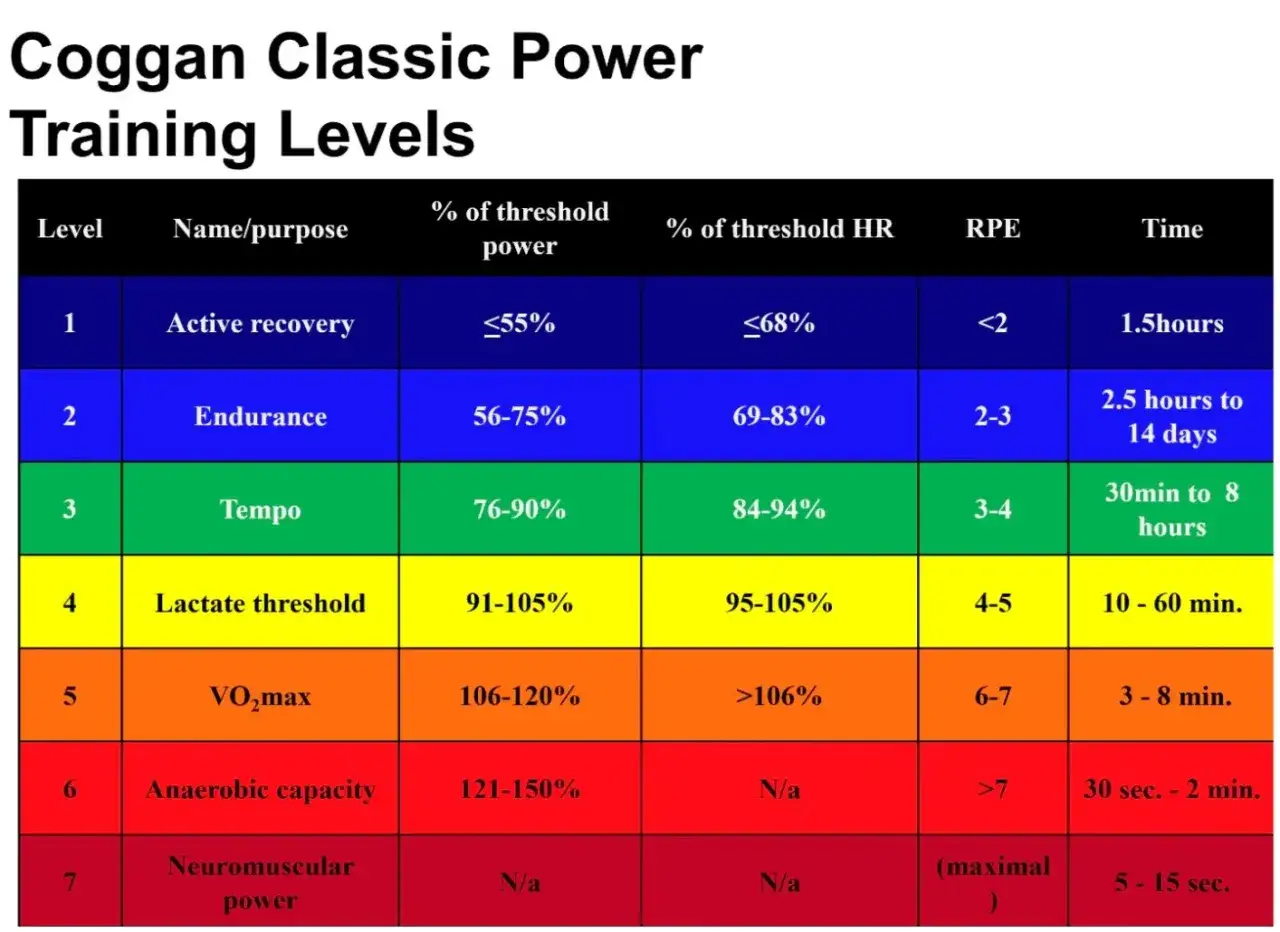
The five-zone model is popular because it is simple enough to remember while riding. The exact labels can vary by platform, but the broad idea stays the same: very easy work at one end, maximal work at the other, with progressively harder effort in between. If you train with power, you will also see seven-zone systems, but the logic is similar even when the names change.
| Zone | Typical heart-rate range | How it feels | Best cycling use |
|---|---|---|---|
| Zone 1 | 50-60% of maximum heart rate | Very easy, fully conversational, almost too light | Recovery spins, warm-ups, very tired days |
| Zone 2 | 60-70% of maximum heart rate | Easy, steady, controlled breathing, you can talk comfortably | Endurance rides, base building, long steady miles |
| Zone 3 | 70-80% of maximum heart rate | Moderate, steady but no longer relaxed | Tempo efforts, rolling terrain, sustained climbs |
| Zone 4 | 80-90% of maximum heart rate | Hard, breathing is heavy, conversation breaks down | Threshold intervals, climb repeats, race-specific work |
| Zone 5 | 90-100% of maximum heart rate | Maximum or near-maximum, only sustainable for short bursts | VO2 max efforts, attacks, short hill surges |
Zone 2 is where a lot of cyclists quietly do the work that actually moves fitness forward, because it lets you accumulate time without turning every ride into a recovery problem. Zone 3 is more useful than people sometimes admit, but it becomes expensive if you live there every day. That is why the next step is not just memorizing the chart, but setting your own ranges with enough accuracy to trust them.
How to set your own ranges without guessing
I usually tell cyclists to choose the method that fits their equipment and the type of riding they do most. If you have power, that should usually be your primary training metric for structured intervals. If you ride mostly outdoors without a meter, heart rate and perceived effort can still do a very good job, as long as you accept their limits.
Start with heart rate if you need a simple baseline
Heart-rate zones are easy to access, but they are only as good as the reference you build them from. A rough age-based maximum heart-rate estimate can get you moving, yet it is not precise enough for serious training decisions. I prefer threshold-based heart-rate zones when possible, because they reflect what you can actually sustain rather than what a formula thinks you might be able to do.
- Use heart rate for steady aerobic rides, longer climbs, and recovery checks.
- Do not expect it to respond instantly during hard intervals.
- Revisit your zones after a real fitness change, not every week.
Use power when you want clean pacing
Power is the cleanest option for structured cycling because it reacts immediately to changes in output. That makes it much better than heart rate for short intervals, hill repeats, and pacing a long climb. Most cycling power systems are built from FTP, or functional threshold power, which is the foundation for the zone chart you see in your training app or head unit.
If you train with power, I would rather see a rider test FTP, set the zones, and keep them consistent for a training block than chase every ride with a different number. The point is not perfection. The point is repeatability.
Read Also: Road Cycling Training Plan - Simple Steps to Real Progress
Keep perceived effort in the loop
Rate of perceived exertion, or RPE, is the part many riders ignore until the data stops making sense. A simple 0-10 scale is enough for most training: easy recovery sits around 2-3, steady endurance around 4-6, hard work around 7-8, and near-max efforts around 9-10. The talk test helps too: if you can speak in full sentences, you are probably still in an aerobic range; if you can only get out a few words, you are well into hard territory.
When the numbers and the feeling disagree, I trust the workout purpose first. On a hot, dehydrated, or stressful day, heart rate can run high for a normal power output. In that case, power tells me what the legs are producing and heart rate tells me how much strain the body is carrying. That combination is far more useful than pretending one reading is always right.
How I would use zones in a cycling week
Once your ranges are set, the real value comes from building the week around them instead of letting every ride drift. Most cyclists do best with a lot of easy volume, a little high-quality intensity, and enough recovery to absorb both. In practice, that usually means keeping most of the week genuinely easy and making the hard sessions specific.
| Goal | Zone focus | Example session | Why it works |
|---|---|---|---|
| Build endurance | Mostly Zone 2 | 90 minutes to 3 hours at a steady pace | Creates aerobic volume without crushing recovery |
| Recover and keep frequency high | Zone 1 | 30 to 45 minutes of very easy spinning | Promotes blood flow and keeps the legs turning |
| Raise sustainable climbing power | Zone 4 | 3 x 10 minutes at threshold with full recoveries | Improves the effort you can hold on long climbs and solo efforts |
| Improve top-end aerobic capacity | Zone 5 | 4 to 6 x 3 minutes hard with easy recovery | Sharpens the ability to handle attacks, surges, and short steep efforts |
| Train well when time is short | Zone 2 plus one quality block | Two endurance rides and one structured interval day | Keeps the week productive without stacking fatigue |
For time-crunched riders, sweet spot work can be a smart middle ground because it delivers a lot of aerobic stimulus for the time invested. If you have power, that usually means riding around 88-94% of FTP for sustained blocks. I would still treat it as a tool, not a lifestyle, because too much of that middle intensity can crowd out both true endurance and true recovery.
In a normal training week, I like the logic of “easy enough to recover, hard enough to matter.” That is why many endurance plans still spend roughly 80% of total training time in the easier ranges. It is not glamorous, but it is often the difference between steady progress and a pile of tired legs.
The mistakes that make zone training disappoint
Zone training fails when riders use the framework mechanically instead of intelligently. The zones are supposed to clarify effort, not create a second source of stress.
- Using someone else’s numbers instead of setting your own.
- Trusting heart rate for short intervals when it is too slow to respond.
- Ignoring heat, dehydration, altitude, caffeine, and poor sleep, all of which can move the numbers around.
- Living in the middle by riding every day at a moderately hard pace that is tiring but not especially productive.
- Re-testing too often or, just as bad, never updating your zones after a real fitness change.
- Forgetting the purpose of the session and chasing a display instead of the actual training goal.
One of the most useful red flags is drift. If heart rate climbs steadily at the same power, or if a pace that once felt easy now feels strained, the day may be hotter, harder, or more fatiguing than the chart suggests. That does not mean the workout is ruined; it just means the zone system is giving you information that needs context.
The simplest way to make the system work on real rides
If I had to reduce all of this to a few habits, I would keep them very plain. Pick one primary metric, keep one reality check beside it, and build the week so your hard days have a purpose and your easy days stay truly easy. Re-check your zones every 6 to 8 weeks, or after a major fitness jump, illness, break, or training block that obviously changed your legs.
- Use power for precise intervals when you have it.
- Use heart rate for longer steady work and for spotting overload.
- Use perceived effort every time, because your body is always present even when the sensors are not.
- Keep easy rides conversational and hard rides specific.
That is usually enough. The best intensity system is not the one that looks smartest on a screen; it is the one that helps you ride with purpose, recover on time, and repeat the process next week without guessing.